

Redis Cache is a key-value store NoSQL database. Its implementation is very similar to Azure Table Storage. The main difference is Redis is very high performing by keeping the data in memory most of the time. By default, Redis also doesn’t persist the data between reboots. The main purpose of keeping Redis Cache in memory is for fast data retrieval and aggregations. Redis is typically used to augment the data store you have already selected. It will make lookups much faster and also helps to reduce the cost of your storage since it reduces the number of queries.
Redis has many uses, but primarily it is a temporary storage location of data that has a longer lifespan. That data needs to be expired when it is out of data and re-populated.
Azure Redis Cache is the Azure product built around Redis and offering it as a Platform as a Service product.
Choose a Redis Cache tier
To create a Redis Cache, follow these steps:
- In the Azure portal select +Create a resource, search for Redis Cache and click Create.
- On the New Redis Chache blade, provide a DNS name, subscription, resource group, location, and pricing tier.
- Click Create.
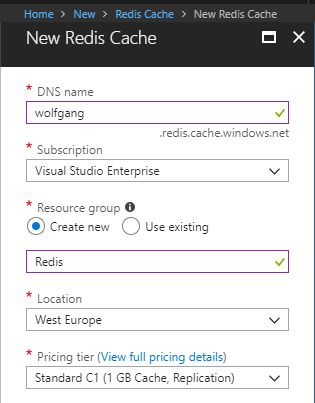
Create a new Redis Cache
There are three pricing tiers:
| Pricing tier | Description |
| Basic | The Basic tier is the cheapest and allows up to 53 GB of Redis Cache database size. |
| Standard | The Standard tier has the same storage limit as Basic but includes replication and failover with master/slave replication. This replication is automatic between two nodes |
| Premium | The Premium tier allows a database size of 530 GB and also offers persistence, which means that the data will survive a power outage. It also includes a much better network performance, allowing up to 40,000 client connections. |
Implement data persistence
Redis persistence allows you to save data to a disk instead of just memory. Additionally, you can take snapshots of your data for backups. This allows your Redis Cache to survive hardware failure and power outages. Redis persistence is implemented through a relational database model, where data is streamed out to binary into Azure Storage blobs.
To configure the frequency of the snapshots, follow these steps:
- In the Azure portal in your Redis Cache, click on Redis data persistence under the Settings menu. Note that you need a premium tier cache to do that.
- On the Redis data persistence blade, select the Backup Frequency and select a storage account.
- Click OK.

Configure data persistence
Implement security and network isolation
The primary security mechanism is done through access keys. The premium tier offers enhanced security features. This is done primarily through virtual networks (VNET) and allows you to hide your Redis Cache behind your application and not have a public URL that is open to the internet
The VNET is configured at the bottom of the New Redis Cache blade. You can’t configure it after it has been created. Additionally, you have to use an existing VNET which is in the same data center as your Redis Cache. The Redis Cache must be created in an empty subnet.
Tune cluster performance
With the premium tier, you can implement a Redis Cluster. This allows you to split the dataset among multiple notes, allowing you to continue operations when a subset of the nodes experiences failure, gives more throughput, and increases memory size as you increase the number of shards. Redis clustering is configured when you create the Azure Redis Cache.
Once the cache is created, Redis distributes the data automatically.
Integrate Redis caching with ASP.NET session and cache providers
Redis Cache is an excellent place to store session data. To implement this, install the Microsoft.Web.RedisSessionStateProvider NuGet package. Once added to the project, add this line to your web.config file under the providers section:
<add name=”MySessionStateStore” type=”Microsoft.Web.Redis.RedisSessionStateProvider” host=”YourHostURL” accessKey=”YourAccessKey” ssl=”true” />
Replace the host with the URL of your cache and the accessKey with your key. You can find the keys on the Access Keys blade and the URL on the Overview blade.
Conclusion
In this short post, I showed how to create a Redis Cache and how to configure data persistence and security using the premium pricing tier.
For more information about the 70-532 exam get the Exam Ref book from Microsoft and continue reading my blog posts. I am covering all topics needed to pass the exam. You can find an overview of all posts related to the 70-532 exam here.
Comments powered by Disqus.