

Azure Cosmos DB DocumentDB is a JSON document store NoSQL database, similar to MongoDB. JSON document stores are the fastest growing NoSQL solutions. The reason why it’s growing so fast is that it doesn’t require assembling or disassembling object hierarchies into a flat relational design. Since the release of Azure Cosmos DB, it has added support for key-value (Table API) and graph (Gremlin).
One of the key advantages of JSON is that it can express an object model that developers often create in code. Object models have parent nodes and child node. When relational database developers create an API to store JSON, they have to undergo a process called shredding when they remove each individual element and store them in flat tables that have relationships with each other. This process is time-consuming, offers little business value and is prone to errors. Because of these drawbacks, developers often turn towards JSON document store where saving a document is as easy as pressing the save icon in an application.
Choose the Azure Cosmos DB API surface
Azure Cosmos DB is a multi-model database that has several different APIs. You can choose between Table, DocumentDB, and GraphDB.
Azure Cosmos DB Table API provides the same functionality as Azure Storage tables. If you have an existing application that uses Azure Storage tables, you can easily migrate that application to use Azure Cosmos DB. This will allow you to take advantage of better performance, global data distribution, and automatic indexing of all fields, thus reducing significant management overhead of your existing Azure Storage table application.
Azure Cosmos Document DB is an easy to implement JSON document storage API. It is an excellent choice for mobile application, web application, and IoT applications.Azure Cosmos DB allows for rapid software development by cutting down the code the developer has to write to either shred their object model into a relational store, or manage the consistency of manual indexing in Azure Storage Tables. It also is compatible with MongoDB. You can migrate an existing MongoDB application easily to Azure Cosmos DB DocumentDB.
Azure Cosmos DB support Gremlin, a popular graph API, This allows developers to write applications that take advantage of Graph traversal of their structures. Graph databases allow you to define the relationship between entities that are stored. For example, you can declare that one entity likes another one and owns a different one. You could say that Wolfgang likes McDonald’s and owns an iPhone. Graph databases excel at defining relationships and exploring the network of those relationships. As a result, they have been popular as engines for social media applications. Because Azure Cosmos DB support the Gremlin API, it is easy to port an existing application to use Azure Cosmos DB.
Create Cosmos DB API Database and Collections
Each Cosmos DB account must have at least one database. A database is a logical container that can contain collections of documents and users. Collections primarily contain JSON documents. Collections should store JSON documents of the same type and purpose, just like a SQL server table. The difference to tables is that collections don’t enforce that documents have a particular schema.
A collection should have documents of the same properties and data types, but it is not required to. Azure Cosmos DB DocumentDB gracefully handles none existing columns on a document. For example, if you are looking for all customer with the country code CH, and a JSON document doesn’t have this property, Azure Cosmos DB just ignores the document and doesn’t return it.
Collections can also store procedures, triggers, and functions. Triggers are application logic that is executed either before or after an insert, delete or update operation. Unlike SQL server, where these components are written in T-SQL, Azure DocumentDB stores procedures, triggers, and functions in JavaScript.
Demo using C#
The code for the following demo can be found on GitHub. To create an Azure Cosmos DB account, follow these steps:
- In the Azure portal, click Create a new Service and then search for Azure Cosmos DB.
- On the Azure Cosmos DB blade, provide a unique ID, subscription, resource group and location. Select an API, for example, SQL and click Create.
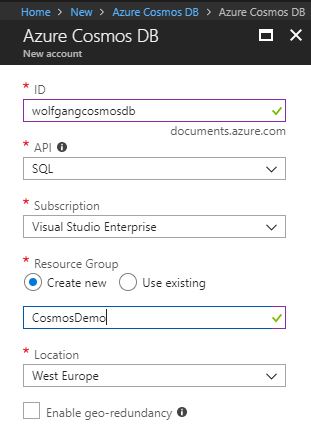
Create an Azure Cosmos DB with a SQL API
- After Azure Cosmos DB is deployed, open Visual Studio 2015 or 2017 and create a new C# console application.
- Install the Microsoft.Azure.DocumentDB NuGet Package.
- Create a DocumentClient variable with your Azure Cosmos DB account URI and primary key. To find your URI and primary key go to your Azure Cosmos DB and select Keys under the Settings menu. I also created two constant variables for the database and the collection.
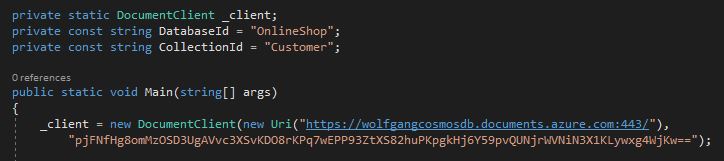
Create variables for the database, collection, and client of your Azure Cosmos DB account
- If the database doesn’t exist yet, create it with the following code:
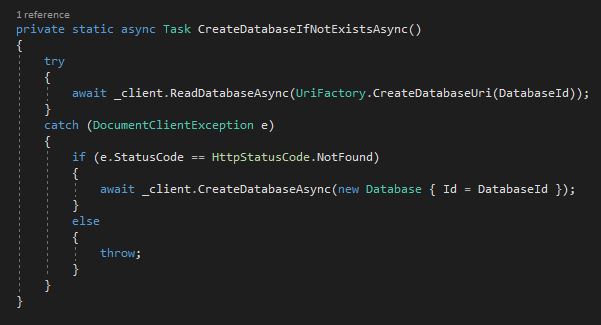
Create the database if it does not exist yet
- Create the collection, if it does not exist yet.
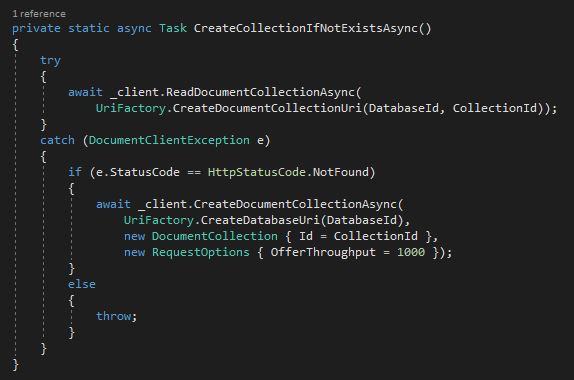
After the database is created, create the collection if it does not exist yet
- Add a new class, Customer, with following properties:
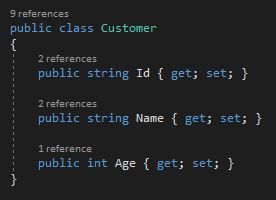
The customer class will be used to add a customer to the database
- Add an item to your collection.

Add an item to the collection
- Retrieve a list of customers with a LINQ expression.
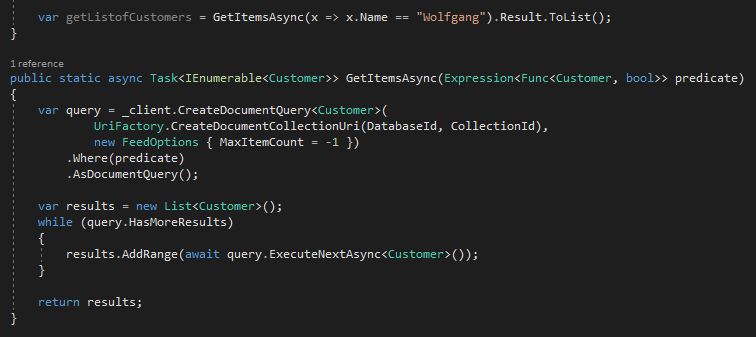
Get a list of customers which fit the LINQ expression
Query documents
Retrieving documents from Azure Cosmos DB DocumentDB is where the magic really happens. With Cosmos DB, the wiring up of persistence store to the object model happens without any data layer code. The main way to retrieve data from Azure Cosmos DB is through LINQ.
In the previous section, I showed how to query data using C#. You can also create queries in the Azure portal using SQL. To do that follow these steps:
- In the Azure portal on your Azure Cosmos DB account, select Data Explorer.
- On the Data Explorer blade select your collections and then click on New SQL Query.
- Enter your query, for example, SELECT * FROM c and click Execute Query.
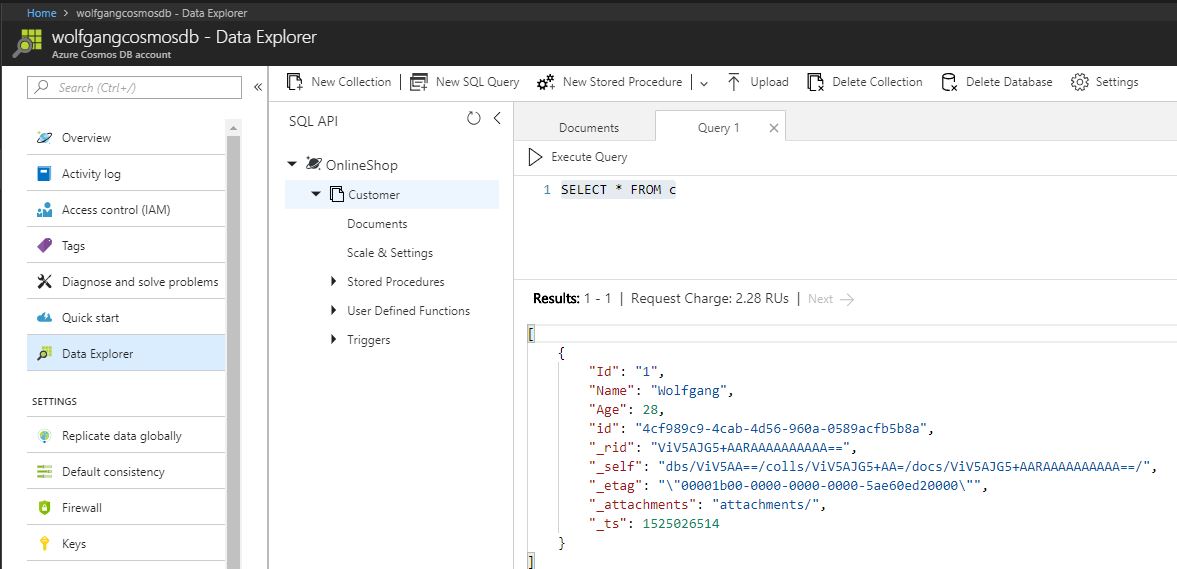
Create a query in the Azure portal using SQL
Create a Graph API database
The code for the following demo can be found on GitHub. To create an Azure Cosmos DB account, follow these steps:
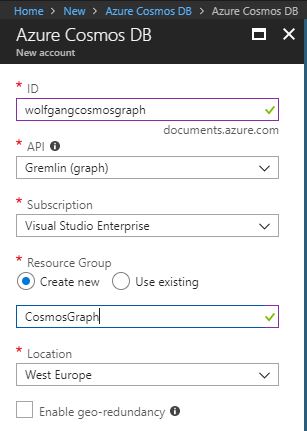
- In the Azure portal, click Create a new Service and then search for Azure Cosmos DB.
- On the Azure Cosmos DB blade, provide a unique ID, subscription, resource group and location. Select Gremlin (graph) as API and click Create.
Create an Azure Cosmos DB with a Graph API
- After Azure Cosmos DB is deployed, open Visual Studio 2015 or 2017 and create a new C# console application.
- Install the Microsoft.Azure.DocumentDB and Microsoft.Azure.Graphs NuGet Packages.
- Enter your URI and primary key and connect to Azure Cosmos DB. To find your URI and primary key go to your Azure Cosmos DB and select Keys under the Settings menu.

Connect to your Azure Cosmos DB
- Next, create a database and a collection within the database.

Create a database with a collection
- After the database and collection are created, add the nodes and edges to a dictionary. Additionally, I add a delete command to delete all entries before adding new ones.
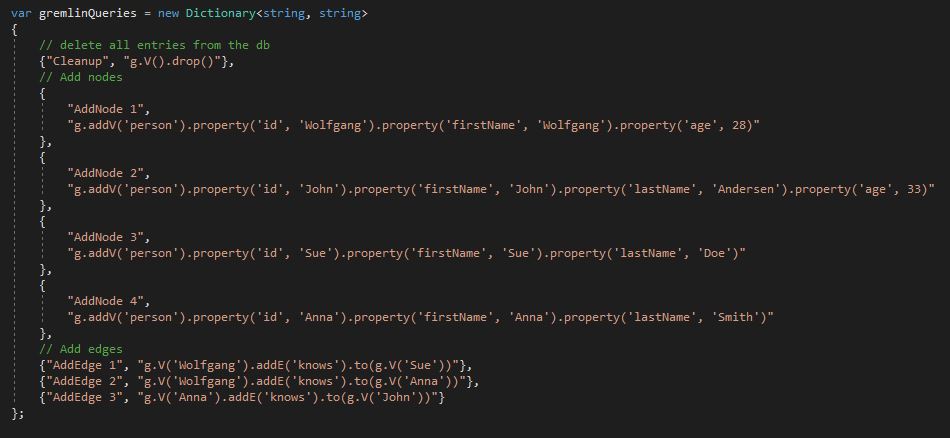
Add nodes and edges
- With all nodes and edges in the dictionary, you can query each entry to add them to the collection.

Add nodes and edges to the collection
- Now, you can see the added nodes and edges as a graph in the Data Explorer of your Azure Cosmos DB.
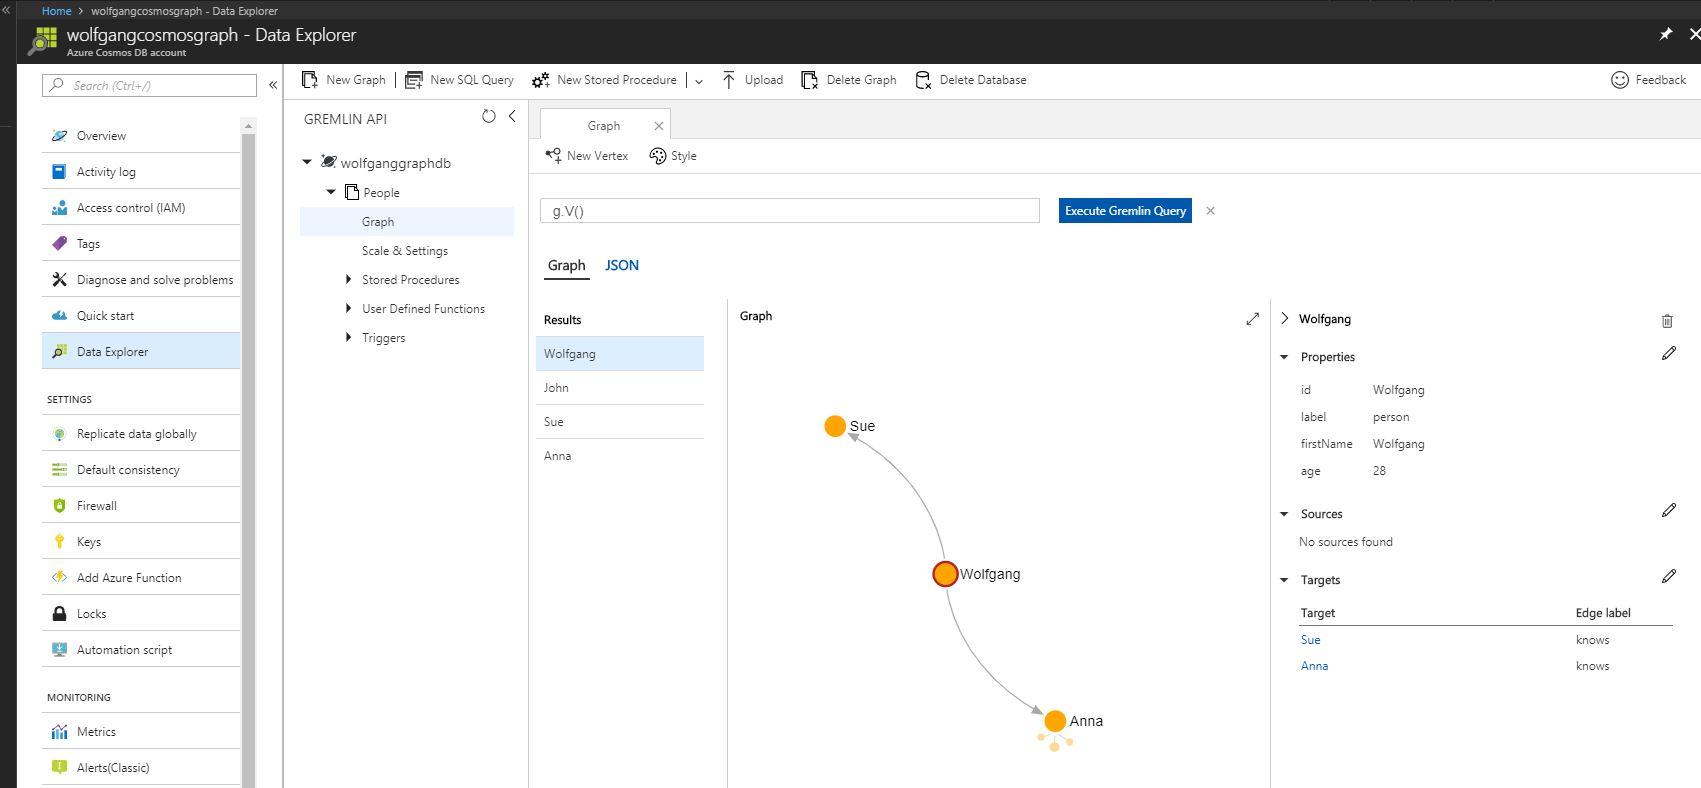
The added nodes and edges displayed as a graph
- Additionally, you can create queries in C#. For example, searching for all people Wolfgang knows.
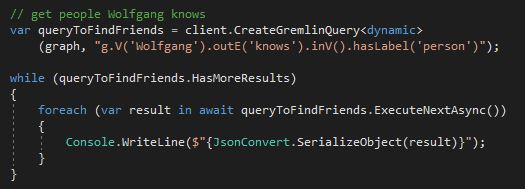
Search for all people Wolfgang knows
Implement MongoDB database
Azure Cosmos DB can be used with applications that were originally written with a MongoDB. Existing MongoDB drivers are compatible with Azure Cosmos DB. Ideally, you would switch from MongoDB to Azure Cosmos DB by just changing the connection string. Additionally, you can use existing MongoDB tooling with Azure Cosmos DB.
Manage scaling of Cosmos DB, including managing partitioning, consistency, and Request Units (RUs)
Collections are assigned a specific amount of storage space and transactional throughput. Transactional throughput is measured in Request Units (RUs). Collections are also used to store similar documents together. A company can choose to organize their documents into a collection in any manner that logically makes sense. A software company might create a single collection per customer. A different company may choose to put heavy load documents in their own collection so they can scale them separately from other collections.
In “Implement Azure SQL database”, I already talked about sharding. Sharding is a feature of Azure Cosmos DB as well. You can shard automatically by using a partition key. Azure Cosmos DB will automatically create multiple partitions for you, Partitioning is completely transparent to your application. All documents with the same partition key value will always be stored on the same partition. Azure Cosmos DB may store different partition keys on the same partition or it may not. The provisioned throughput of a collection is distributed evenly among the partitions within a collection.
Partitioning is always done at the collection, not at the Azure Cosmos DB account level. You can have a collection that is a single partition alongside multiple partition collections. Single partition collections have a 10 GB storage limit and can have up to 10,000 RUs. When you create them, you do not have to specify a partition key.
Create a single partition collection
To create a single partition collection, follow these steps:
- In the Azure portal on your Azure Cosmos DB account(SQL API), click +Add Collection on the Overview blade.
- On the Add Collection blade, provide a name for the database and collection, set the Storage capacity and the throughput, and leave the partition key empty.
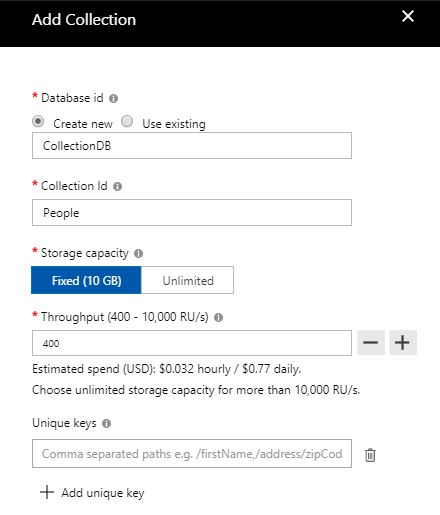
Add a collection to your Azure Cosmos DB
For multiple partition collections, it is important that you choose the right partition key. A good partition key will have a high number of distinct values without being unique to each individual document. Partitioning based on geographic location, a large data range, department, or customer type is a good idea. The storage size for documents with the same partition key is 10 GB. The partition key should also be in your filters frequently.
A partition key is also a transaction boundary for stored procedures. Choose a key on documents that often get updated together with the same partition key value.
Consistency
Relational databases have a little bit of baggage as it relates to data consistency. Users of those systems have the expectation that when they write data, already of that data will see the latest version of it. That strong consistency level is great for data integrity and notifying users when data changes, but creates problems with concurrency. Writers have to lock data as they write, blocking readers of the data until the write is over. This creates a line reader waiting to read until the write is over. Having writes block readers gives the readers the impression that the application is slow.
This has particularly created issues when scaling out relation databases. If a write occurs on the partition and it hasn’t replicated to another partition, readers are frustrated that they are seeing bad or outdated data. It is important to understand that consistency has long had an inverse relationship with concurrency.
Many JSON document storage products have solved that trade off by having a tunable consistency model. This allows the developer to choose between strong and eventual consistency. Strong consistency slows down reads and writes while giving the best data consistency between users. Eventual consistency allows the readers to read data while writes happen on a different replica, but isn’t guaranteed to return current data. Things are faster because replicas don’t wait to get the latest updates from a different replica.
The five levels of consistency
There are five consistency levels in the Cosmos DocumentDB:
| Consistency level | Description |
| Strong | Strong consistency slows down reads and writes while giving the best data consistency between users. |
| Bounded Staleness | Bounded staleness consistency tolerates inconsistent query results, but with a freshness guarantee that the results are at least as current as a specified period of time. |
| Session | Session consistency is the default in DocumentDB. Writers are guaranteed strong consistency on writers that they have written. Readers and other writer sessions are eventually consistent. |
| Consistent Prefix | Consistent prefix consistency guarantees that readers do not see out of order writes. Meaning the writes may not have arrived yet, but when they do, they’ll be in the correct order. |
| Eventual | Eventual consistency allows the readers to read data while writes happen on a different replica, but isn’t guaranteed to return current data. Things are faster because replicas don’t wait to get the latest updates from a different replica. |
Manage multiple regions
It is possible to distribute data in Azure Cosmos DB globally. The main reason to do that is to get the data closer to the users, therefore, they have a lower latency. A downside is that each replica will add to your Azure Cosmos DB costs.
In a single geo-location Azure Cosmos DB collection, you can’t really see the difference in consistency choices from the previous section. Data replicates so fast that the user always sees the latest copy of the data (with few exceptions). When replicating data around the globe, choosing the correct consistency level becomes more important.
To distribute data globally, follow these steps:
- In the Azure portal, on your Azure Cosmos DB account, click on Replicate data globally under the Settings menu.
- On the Replicate data globally blade, select the regions to add by clicking on the map. These new regions are read regions. Read regions often outnumber write regions, which can drastically improve the performance of your application.

Enable geo-configuration for your Azure Cosmos DB
- Click Save.
- After the new regions are set up, click on Automatic Failover on the top of the Replicate data globally blade.
- On the Automatic Failover blade, move the slider to on and optionally change the priority of the read regions by dragging them up or down.
- Click OK.
- If your write region is unavailable, Azure will automatically switch the write region to your highest read region.
You can also use C# code to set the preferred region. To do that use this code:
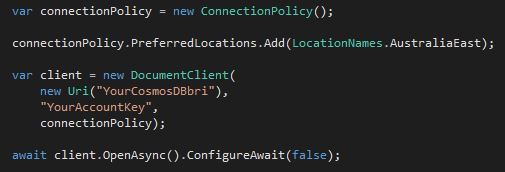
Set the preferred region
For more information, see the documentation.
Implement stored procedures
As previously mentioned, like relational databases, Azure Cosmos DB collections can have stored procedures, triggers, and user-defined functions. The difference is that in Azure Cosmos DB, they are written in JavaScript. Batch operations executed on the server will avoid network latency and will be fully atomic across multiple documents in that collection’s partition. Operations in a stored procedure either all succeed or all fail.
Access Azure Cosmos DB from REST interfaces
Azure Cosmos DB has a REST API that provides a programmatic interface to create, query, and delete databases, collections, and documents. So far, I only used the Azure Document DB SDK in C#, but it is possible to call the REST URIs directly without the SDK. The SDK makes these calls simpler and easier to implement. SDKs are available for Python, JavaScript, Node.js, and Xamarin. These SDKs all call the REST API underneath. Using the REST API allows you to use a language that might not have an SDK, like Elixir.
The REST API allows you to send HTTPS requests using GET, POST, PUT, and DELETE to a specific endpoint.
Manage Azure Cosmos DB security
Security is probably the biggest concern when using the cloud. Microsoft invests therefore heavily in its security. In this section, I will talk about the different security features of the Azure Cosmos DB.
Encryption at rest
Encryption at rest means that all physical files used to implement Cosmos DB are encrypted on the hard drives they are using. Anyone with direct access to those files would have to unencrypt them in order to read the data. This also applies to all backups of Azure Cosmos DB databases. There is no need for configuration of this option.
Encryption in flight
Encryption in flight is required when using Azure Cosmos DB. All REST URI calls are done over HTTPS. This means that anyone sniffing a network will only see encryption round trips and not clear text data.
Network firewall
Azure Cosmos DB implements an inbound firewall. This firewall is off by default and needs to be enabled. You can provide a list of IP addresses that are authorized to use Azure Cosmos DB. You can specify the UP addresses one at a time or in a range. This ensures that only an approved set of machines can access Azure Cosmos DB. These machines will still need to provide the right access key in order to gain access.
The enable the firewall and configure IP addresses, follow these steps:
- In the Azure portal, go to your Azure Cosmos DB account and click on Firewall under the Settings blade.
- Select the Selected networks checkbox and enter a single IP address or a range.
- Click Save.
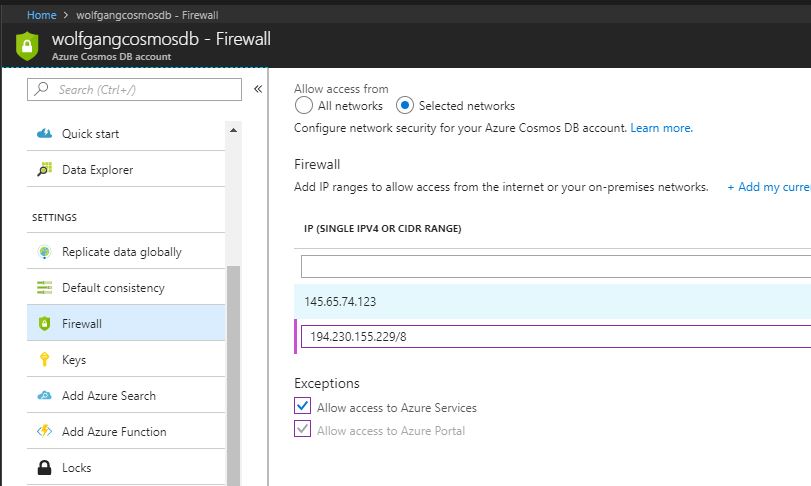
Add IP addresses to your firewall
Users and permissions
Azure Cosmos DB support giving access to users in the database to a specific resource or using Active Directory users. The Role Based Access Control supports different roles like Owner, Contributor or Reader. Based on the role, a user has different rights. For example, a user with read rights can only access the resource for reading whereas the Owner can do everything.
Active Directory
Follow these steps to use the Active Directory to give an user access to the Azure Cosmos DB:
- In the Azure portal, go to your Azure Cosmos DB account and click on Access control (IAM).
- On the Access control (IAM) blade, click on +Add.
- On the Add permissions blade, select a role and a user. You can search for users by name or email address.
- Click Save.
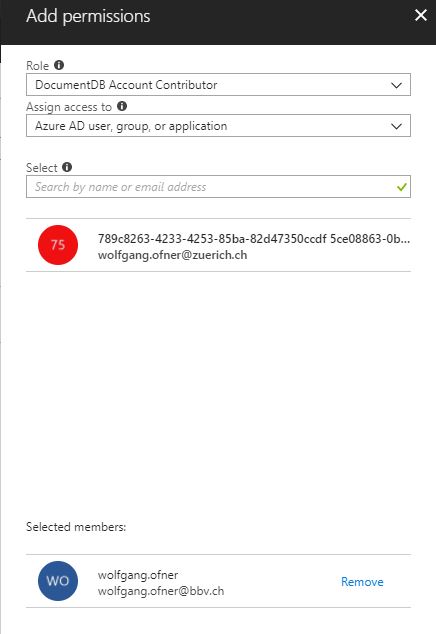
Grant a user the DocumentDB Account Contributor access
Conclusion
In this post, I talked about the different types of the Azure Cosmos DB. First, I showed how to create a database, a collection and query data using C# for the SQL API. Then, I showed the same for the Graph API using C# and also the Azure portal. Next, I explained what Request Units are and how to scale your database by increasing them. Another way to increase the performance is to use sharding which splits up your database into several parts. Using multiple regions for your Azure Cosmos DB can increase the performance and also decrease the latency for users around the globe.
In the last section, I explained some security features of Azure Cosmos DB. Files can be encrypted at rest and also during the transfer. Additionally should be the firewall activated to restrict the access. Azure supports different roles with different access rights which can be configured with the Active Directory.
You can find the demo for the Azure Cosmos DB (SQL API) here and the demo for the Azure Cosmos DB (Graph API) here.
For more information about the 70-532 exam get the Exam Ref book from Microsoft and continue reading my blog posts. I am covering all topics needed to pass the exam. You can find an overview of all posts related to the 70-532 exam here.
Comments powered by Disqus.