I talked about HTML Helper Methods in my last post. Although it was a pretty lengthy post, I only talked about the basic helper methods. The problem with this approach was that I had to decide which input field I want to render. I want to tell the framework which property I want to be displayed and let the framework decide which HTML element gets rendered. Therefore, I want to talk about templated helper methods today and show how they can be used to easily create views with even less programming to do.
Setting up the project
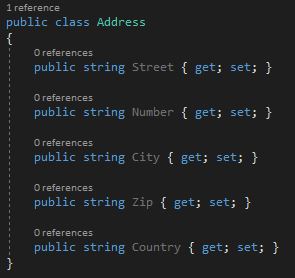
I use the same project as last time. The only changes I made was adding an address and the birthday to the customer class. You can download the code here.
Using Templated Helper Methods
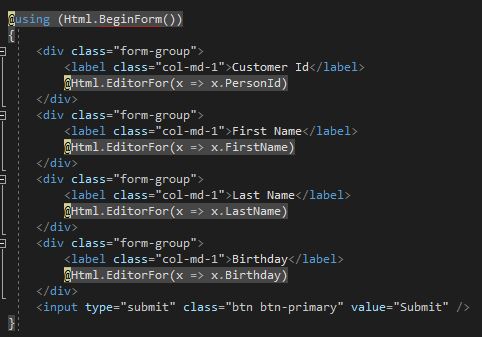
The simplest templated helper method is Html.Editor and the strongly typed version Html.EditorFor. I like the strongly typed version due to it’s IntelliSense support and pass the property name as the parameter. The MVC framework renders the element which it thinks fits best.
The output can vary depending on what browser you use. When you go to the devTools and inspect the rendered elements, you will see that the type for CustomerId is number and the type of Birthday is datetime whereas all the others have the type text. This type tells the browser which element it should render.
The MVC framework has the following built-in templated helper methods:
| Helper | Example | Description |
| Display | Html.Display(“PropertyName”) | Renders a read-only view of the specified model property, choosing an HTML element according to the property’s type and metadata |
| DisplayFor | Html.DisplayFor(x => x.PropertyName) | Strongly typed version of the Display helper |
| Editor | Html.Editor(“PropertyName”) | Renders an editor for the specified model property, choosing an HTML element according to the property’s type and metadata |
| EditorFor | Html.EditorFor(x => x.PropertyName) | Strongly typed version of the Editor helper |
| Label | Html.Label(“PropertyName”) | Renders an HTML label element referring to the specified model property |
| LabelFor | Html.LabelFor(x => x.PropertyName) | Strongly typed version of the Label helper |
Displaying the Model with Templated Helper Methods
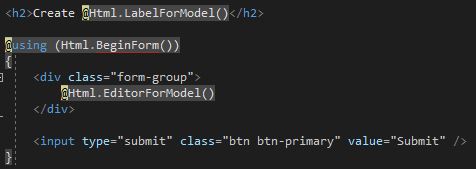
So far I have used templated helper methods for every property. The MVC framework also offers methods to process an entire model. This process is called scaffolding.
The following templated helper methods are available for the scaffolding process:
| Helper | Example | Description |
| DisplayForModel | Html.DisplayForModel() | Renders a read-only view of the entire model object |
| EditorForModel | Html.EditorForModel() | Displays editor elements for the entire model object |
| LabelForModel | Html.LabelForModel() | Renders an HTML label element referring to the entire model object |
With these templated helper methods it is possible to render forms with just a couple lines of code. This makes them easy to read and easy to change.
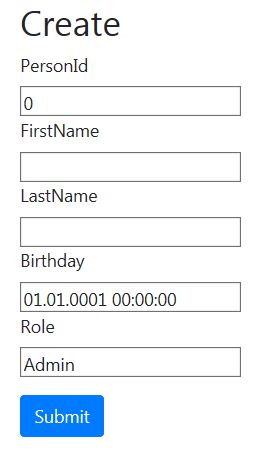
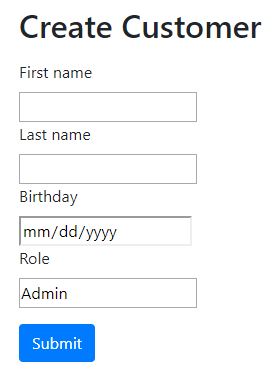
When you look at the result you can see that there are some problems with the output:
The Html.LabelForModel method didn’t render anything in the headline, and the role is a textbox instead of a drop-down list. (this time it is not the fault of IE) Additionally, the Address is not rendered and probably I don’t want to display the Id to the user.
The solution to this problem is to add attributes to the model class to tell the framework what and how it should render the properties.
Using Model Attributes
The MVC framework renders the HTML fields which it thinks fit best. As you saw in the last example, this is not always what you expect or want. I like the templated helper methods because they make the view so simple but I also have to ensure that they render what I want. I can add some metadata to my model to tell the MVC framework how to handle the property. ASP.NET MVC has a variety of built-in attributes which help me to display what I want with the scaffolding process.
Using Metadata for Data Values
Attributes offer a convenient way to tell the rendering engine which datatype it renders. For example, I can tell it that I only want to display the date part of the birthday or that I want to render a password field which masks the user’s input.
The ASP.NET MVC framework offers the following datatype attributes:
| DataType Value | Description |
| Date | Displays the date part of a DateTime |
| DateTime | Displays a date and time (this is the default behavior for System.DateTime values) |
| EmailAddress | Displays the data as an e-mail address (using a link (a) element with a mailto href) |
| MultilineText | Renders the value in a textarea element |
| Password | Displays the data so that individual characters are masked from view |
| PhoneNumber | Displays a phone number |
| Text | Displays a single line of text |
| Time | Displays the time part of a DateTime |
| Url | Displays the data as a URL (using an HTML link (a) element) |
Hide or Display Elements using Metadata
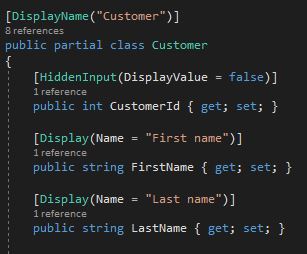
Earlier I said that I don’t want to display the CustomerId to the user. It is common not to display all information, for example, the id or primary key of an element is usually not relevant to the user. To hide a property, I decorate it with the HiddenInput attribute and set the DisplayValue to false.
I have to set the DisplayValue property to false because otherwise, the MVC framework would render a read-only field.
Another approach to hide a property is to exclude it from scaffolding with [ScaffoldColumn(false)]. The problem with the excluding is that it doesn’t get sent to the view. Therefore if the user returns the view for example after editing some information, the id is not included and so I don’t know which user was sent back.
Using Attributes to display Property Names
The scaffolding process displays the name of the property as the label. The problem is that property names are rarely useful to the user. No user wants to read FirstName. A user expects First name. Therefore, I can decorate properties with the Display attribute and a class with the DisplayName attribute. As the parameter, I pass the name which I want to be displayed.
When I start the application now, nice names are displayed and also Person in the header will be rendered.
Applying Metadata to automatically created Classes
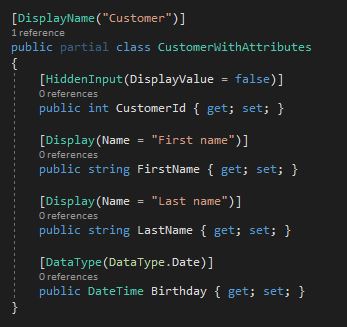
It is not always possible to apply attributes to classes because they are automatically generated by tools like the Entity Framework. (Actually, you can add attributes but they will be overridden the next time the class gets updated and therefore generated again). The solution to this problem is to add a partial class of the class you want to extend with the same properties and add the attributes there. To be able to do that the original class has to be partial as well. Fortunately Entity Framework creates partial classes. Then you have to add the MetadataType attribute to the class with typeof(your class) as the parameter.
On the screenshot above, I created a partial class and called it CustomerWithAttributes. Then I added all attributes from the Customer class which has attributes. Additionally to these changes, I made the Customer class partial and added the MetadataType attribute to it with the CustomerWithAttributes class as the parameter.
I also removed all attributes from this class since I want to simulate an automatically generated class. If you run your application now, it will look as before. Note that the partial classes have to be in the same namespace.
Displaying Complex Type Properties with Templated Helper Methods
The next part I want to fix is the display of the Address and its properties. The Address properties weren’t rendered yet because the EditorFor helper can only operate on simple types such int or string. Therefore it does not work recursively and as a result complex data types get ignored. The reason why the MVC framework is not rendering properties recursively is that it could easily trigger lazy-loading which will result in rendering all elements from the database.
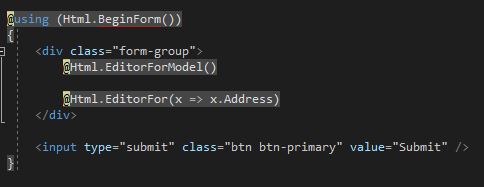
To render complex datatype, I have to explicitly tell the MVC framework how to do that by creating a separate call to the templated helper method:
The only change I had to make was adding the line with EditorFor and all properties of the Address class will be rendered after the previously rendered properties.
Conclusion
In this post, I refactored the application of my last post to use templated helper methods which enables you to create a view with only a couple of codes. To help the render engine, I showed how to add additional information on what you want to be rendered by applying attributes to the model class. The result is that the view is simple to understand and can be easily extended or changed.
For more details about model validation, I highly recommend the books Pro ASP.NET MVC 5 and Pro ASP.NET MVC 5 Plattform.
You can find the source code with all examples on GitHub.




Comments powered by Disqus.