

A Mobile App in Azure App Service provides a platform for the development of mobile applications, providing a combination of backend Azure hosted services with device side development frameworks that streamline the integration of the backend services.
Mobile Apps enables the development of applications across a variety of platforms, targeting native iOS, Android, and Windows apps, cross-platform Xamarin and Cordova.
Azure Mobile Apps provide functionality for:
| Functionality | Description |
| Authentication and authorization | Enables integration with identity providers including Azure Active Directory, Google, Twitter, Facebook, and Microsoft. |
| Data Access | Enables access to tabular data stored in an Azure SQL Database or an on-premise SQL Server via an automatically provisioned and mobile-friendly OData v3 data source |
| Offline sync | Enables reads as well as create, update, and delete activity to happen against the supporting tables even when the device is not connected to the network, and coordinates the synchronization of data between local and cloud stores as dictated by the application logic. |
| Push notifications | Enables the sending of push notifications to app users via Azure Notifications Hubs, which in turn supports the sending of notifications across the most popular push notifications services for Apple, Google, Windows and Amazon devices. |
Create a mobile app
The following steps are necessary to create a mobile app:
- Identify the target device platforms you want your app to target.
- Prepare your development environment.
- Deploy an Azure Mobile App Service instance.
- Configure the Azure Mobile App Service.
- Configure your client application.
- Augment your project with authentication/authorization, offline data sync, or push notification capabilities.
Identify the target device platform
Decide if you want to develop your Mobile App as native Android, Cordova, native iOS, Windows, Xamarin Android, Xamarin Forms or Xamarion iOS application.
Prepare your development environment
The requirements for your development environment vary depending on the device platforms you wish to target. For example, iOS developers use macOS and Xcode whereas Android developers macOS or Windows and Android Studio use.
Deploy an Azure Mobile App Service
To create an Azure Mobile App Service instance, follow these steps:
- In the Azure portal click on +Create a resource, search for Mobile App and click Create.
- Provide a name, subscription, resource group and, service plan.
- Click Create
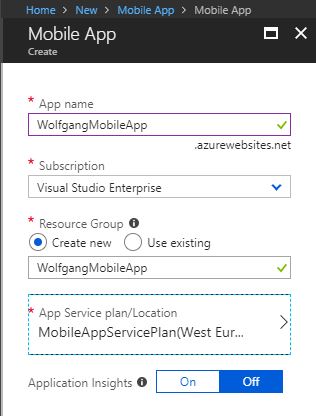
Create a Mobile App
Configure the Mobile App
- After the Mobile App is deployed, follow these steps to configure it:
Open your Mobile App in the Azure portal and click on Quick Start under the Deployment menu. - On the Quickstart blade, select the platform you wish to target, for example, Windows (C#).
- Click on “You will need a database in order to complete this quick start. Click here to create one.
- On the data Connections blade, click +Add to create a new SQL database or select one from the list if you already have one.
- Select a backend language, for example, C#.
- Download the zip file and unpack it.
- Compile the application and then deploy it to your Mobile App to Azure.
- To deploy your app right click on the project in Visual Studio, select Publish and then select your previously created Mobile App by clicking on Select Existing in the Azure App Service tab.
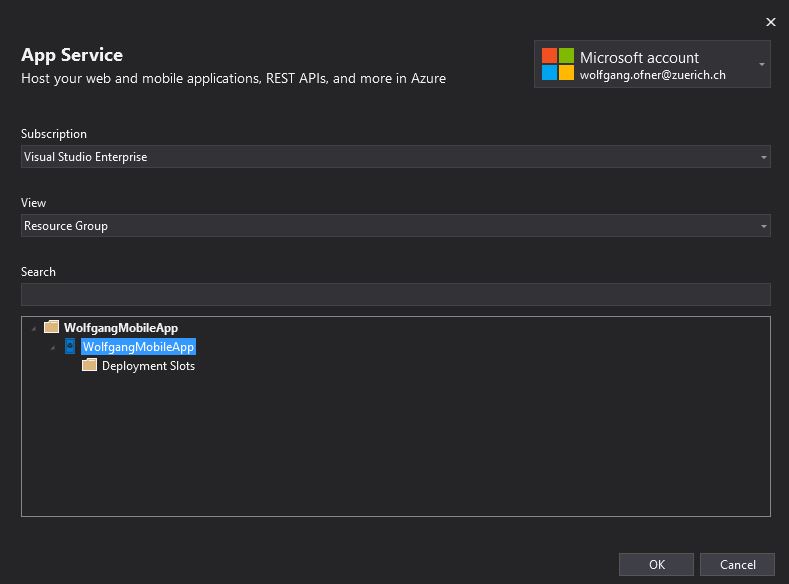
Deploy your Mobile App to Azure
- After the deployment is finished, the browser is opened and displays that your Mobile App is running.

The Mobile App is deployed and running
Configure your client application
You can create a new application from the Quickstart blade, or by connecting an existing application. To download the template application, click on Create a new app and then download under section 3 Configure your client application on the Quickstart blade.
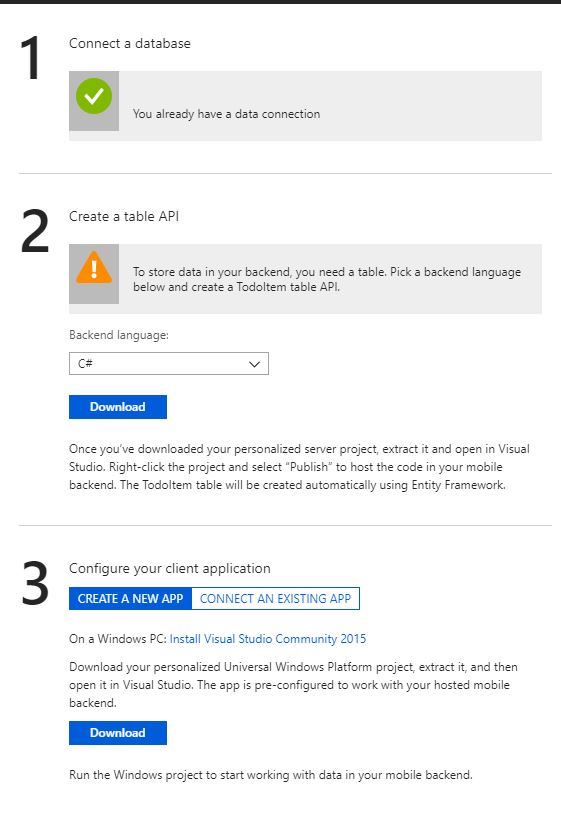
Download templates for your Mobile App
Add authentication to a mobile app
To enable the integration of identity providers like Facebook or Twitter, follow these steps:
- For each identity provider, you want to support, you need to follow the provider’s specific instructions to register your app and retrieve the credentials needed to authenticate using that provided.
- Open your Mobile App and select Authentication / Authorization under the Settings blade.
- On the Authentication / Authorization configure the provider you want to use. For example, for Twitter, you have to enter your API Key and API Secret which you get on Twitter’s developer page.
- In the Allowed external redirect URLs textbox, enter your callback URL, for example, myapp://myauth.callback.
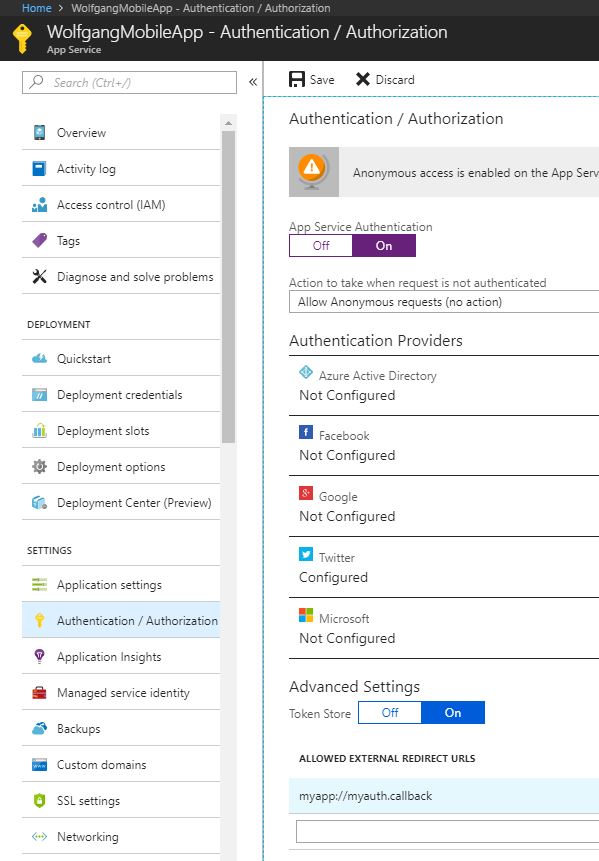
Enable Twitter authentication and authorization
- Click Save.
- In your C# application decorate all controller and/or action which should be only accessed be logged in users with the [Authorize] attribute.
- Add your authentication logic to the project.
- Run your application in your local simulator or device to verify the authentication flow.
The steps 6-8 are only an overview because an exact explanation would be too much for here. If you don’t know how the Authorize attribute works, create a new ASP.NET MVC project form the template in Visual Studio. There it is implemented and you can see that an action or controller with this attribute redirects the user to the login page.
Add offline sync to a Mobile App
The offline data sync capability comes from a mix of client-side SDK and service-side features. These features include, for example, support for conflict detection when the same record is changed on both the client and backend, and it allows for the conflicts to be resolved.
For the conflicts to be resolved you need a table that leverages Mobile App easy tables on the service side. This is usually a SQL Database exposed by Mobile Apps using the OData endpoint.
On the client side, the Azure Mobile App SDKs provide an interface referred to as a SyncTable that wraps access to the remote easy table. When using a Synctable all the CRUD operations work from a local store, whose implementation is device platform specific. For example, iOS uses the local store based on Core Data whereas Xamarin and Androids local store is based on SQL lite. Changes to the data are made through a sync context object that tracks the changes that are made across all tables. This sync context maintains an operation queue that is an ordered list of create, update and delete operations that have been performed against the data locally.
Add push notifications to a Mobile App
Push notifications enable you to send app-specific messages to your app running across a variety of platforms. In Azure Mobile Apps, push notification capabilities are provided by Azure Notification Hubs. Notification Hubs abstract your application from the complexities of dealing with the various push notification systems (PNS) that are specific to each platform. Notification Hubs support the sending of notifications across the most popular push notification services for Apple, Google, Windows, and Amazon.
To add push notifications, follow these steps:
- Open your Mobile App and select Push under the Settings menu.
- On the Push blade, connect to a Notification Hub. If you don’t have one yet, you can create one on the blade.
- After your Notification Hub is connected, click on Configure push notification services.
- On the Push notification services blade, enter the configuration of the notification service you want to use.
- Click Save.
- Configure your app project to respond to push notifications.
Conclusion
In this post, I showed how to leverage Azure Mobile App services to easily create a mobile app using modern features like push notifications and offline sync.
For more information about the 70-532 exam get the Exam Ref book from Microsoft and continue reading my blog posts. I am covering all topics needed to pass the exam. You can find an overview of all posts related to the 70-532 exam here.
Comments powered by Disqus.