

In my last post, I created an Azure Function that reads messages from an Azure Service Bus Queue and then updates a database. The deployment of the Azure Function was manual using Visual Studio.
Since I am a big fan of DevOps, I will create an Azure DevOps pipeline today to automate the deployment.
This post is part of “Microservice Series - From Zero to Hero”.
Create a basic YAML pipeline in Azure DevOps
You can find the code of the demo on GitHub.
Create a basic YAML pipeline in Azure DevOps where you restore the NuGet packages, build the solution, and publish it. For more information about Azure DevOps YAML pipelines, see my post Build .NET Core in a CI Pipeline in Azure DevOps.
Your basic pipeline should look something like this:
The pipeline above runs automatically when changes are detected on the master branch inside the AzureFunctions/OrderApi.Messaging.Receive/ folder and uses the newest Ubuntu VM to run the build. Next, I configure a couple of variables and then run the restore, build and publish of the solution.
Deploy the Azure Function
Before you can deploy to Azure, you need a service connection. If you don’t have one yet, see Deploy to Azure Kubernetes Service using Azure DevOps YAML Pipelines to set up one.
With the service connection in place, add the following task to the pipeline:
This task takes the previously created .zip file (during the publish) and deploys it to an existing Azure Function. All you have to do is replace the appName with your Azure Function name. Note that the Azure Function has to exist, otherwise the task will fail. If your Azure Function runs on Windows, use functionApp as the appType.
Update the Azure Function Settings
The Azure Function can be deployed but it won’t work because it has no access to the Azure Service Bus Queue or database. To provide access, you have to update the service settings. First, add secrets to your Azure Pipeline by using the Variables button on the right side.
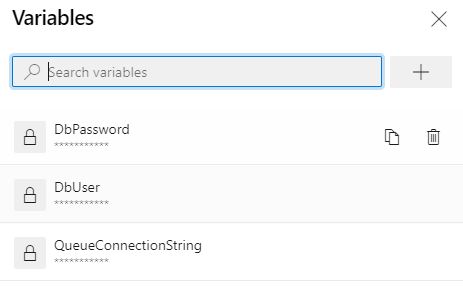
Add secret variables to the pipeline
Next, add the following variables to your pipeline:
Lastly, add the Azure App Service Settings task to update the service settings:
For more information about the Azure Service Bus Queue, see my post Replace RabbitMQ with Azure Service Bus Queues. The pipeline is finished. Deploy the Azure Function and test it.
Testing the deployed Azure Function
If you followed this series (“Microservice Series - From Zero to Hero”), you know that I am using a Customer microservice that writes updates into a queue and the Azure Function takes these messages to update the database of the Order microservice.
To test that the Azure Function works, first check the orders, especially the names in the Order database.

The orders before the update
Next, update a customer name, for example, from Wolfgang Ofner to Name Changed. The Customer microservice writes this update in the queue (or you add the message manually into the queue). The Azure Function sees the new messages, reads them, and then updates the orders in the database. After the Azure Function ran, check the orders in the database and you will see the changed name.

The name was updated
Conclusion
Deploying Azure Functions with Azure DevOps only takes a couple of lines of code and should never be done manually. Additionally, it is very easy to update the existing settings without exposing any sensitive data.
In my next post, Deploy a Docker Container to Azure Functions using an Azure DevOps YAML Pipeline, I will show you how to deploy an Azure Function inside a Docker container.
You can find the code of the demo on GitHub.
This post is part of “Microservice Series - From Zero to Hero”.
Comments powered by Disqus.