

Tag helpers are a new feature that has been introduced in ASP.NET Core MVC and are C# classes that transform HTML elements in a view. Common uses for tag helpers include URLs for forms using the application’s routing configuration, ensuring that elements of a specific type are styled consistently, and replacing custom shorthand elements with commonly used fragments of content.
You can find the source code for the following on GitHub.
Creating Tag Helpers
Tag helpers can be used to apply certain CSS classes to HTML. For example you could create a tag helper that transforms an element from <button type=”submit” bs-button-color=”danger”>Add</button> to <button type=”submit” class=”btn btn-danger”>Add</button>. The tag helper will recognize the bs-button-color attribute and use its value to set the class attribute on the element sent to the browser. This example might not look very useful, but it provides a foundation for explaining how tag helpers work.
Defining the Tag Helper class
Tag helpers can be defined anywhere in the project, but it helps to keep them together because they need to be registered before they can be used. I usually create the tag helpers under Infrastructure/TagHelpers.
Tag helpers are derived from the TagHelper class, which is defined in the Microsoft.AspNetCore.Razor.TagHelpers namespace.

Creating a Tag Helper to transform a button
The TagHelper class defines a Process method, which is overridden by subclasses to implement the behavior that transforms elements. The name of the tag helper combines the name of the element it transforms followed by TagHelper. The scope of a tag helper can be broadened or narrowed using attributes, which I will describe later in this post.
Asynchronous tag helpers can be created by overriding the ProcessAsync method instead of the Process method, but this isn’t required for most helpers, which tend to make small and focused changes to HTML elements. The default implementation of ProcessAsync calls the Process method anyway.
Receiving Context Data
Tag helpers receive information about the element they are transforming through an instance of the TagHelperContext class, which is received as an argument to the Process method and which defines the following properties:
| Name | Description |
| AllAttributes | This property returns a read-only dictionary of the attributes applied to the element being transformed, indexed by name and by index. |
| Items | This property returns a dictionary that is used to coordinate between tag helpers. |
| UniqueId | This property returns a unique identifier for the element being transformed. |
Although you can access details of the element’s attributes through the AllAttributes dictionary, a more convenient approach is to define a property whose name corresponds on the attribute you are interested in, like in the example above: public string BsButtonColor { get; set; }.
When a tag helper is being used, MVC inspects the properties it defines and sets the value of any whose name matches attributes applied to the HTML element. As part of this process, MVC will try to convert an attribute value to match the type of the C# property so that bool properties can be used to receive true and false attribute values and int properties can be used to receive numeric attribute values such as 1 and 2.
The name of the attribute is automatically converted from the default HTML style, bs-button-color to the C# style BsButtonColor. You can use any attribute prefix except asp- and data-. Properties for which there are no corresponding HTML element attributes are not set, which means you should check to ensure that you are not dealing with null or default values. Using the HTML attribute name for tag helper properties doesn’t always lead to readable or understandable classes. You can break the link between the name of the property and the attribute it represents using the HtmlAttributeName attribute, which can be used to specify the HTML attribute that the property will represent.
What happened to HTML Helpers?
HTML helpers were methods accessed through Razor expressions that begin with @Html, for example. @Html.TextBoxFor(m => m.Name) would create a textbox for the name property. The problem with HTML helper expressions is that they don’t fit with the structure of HTML elements, which leads to awkward expressions, especially when adding CSS, for example. @Html.TextBoxFor(m => m.Name, new { @class = “form-control” }). Attributes have to be expressed in a dynamic object and have to be prefixed with @ if they are reserved C# words, like class. As the HTML elements that are required become more complex, the HTML helper expression becomes more awkward. Tag helpers remove this awkwardness, for example, <input class=”form-control” asp-for=”Population” />.
The result is a more natural fit with the nature of HTML and produces views that are easier to read and understand. MVC still supports HTML helpers, so you can use them for backward compatibility in views originally developed for MVC 5, but new views should take advantage of the more natural approach that tag helpers provide.
Producing Output
The Process method transforms an element by configuring the TagHelperOutput object that is received as an argument. The TagHelperOutput starts out describing the HTML element as it appears in the Razor view and is modified through the following properties:
| Name | Description |
| Attributes | This property returns a dictionary containing the attributes for the output element. |
| Content | This property returns a TagHelperContent object that is used to set the content of the element. |
| TagName | This property is used to get or set the tag name for the output element. |
| PreElement | This property returns a TagHelperContext object that is used to insert content in the view before the output element. |
| PostElement | This property returns a TagHelperContext object that is used to insert content in the view after the output element. |
| PreContent | This property returns a TagHelperContext object that is used to insert content before the output element’s content. |
| PostContent | This property returns a TagHelperContext object that is used to insert content after the output element’s content. |
| TagMode | This property specifies how the output element will be written, using a value from the TagMode enumeration. |
| SupressOuput() | Calling this method excludes an element from the view. |
Registering Tag Helpers
Tag helper classes can be used only after they have been registered using the Razor @addTagHelper expression. The set of views to which a tag helper will be applied depends on where the @addTagHelper expression is used. For a single view, the expression appears in the view itself. For a subset of views in an application, the expression appears in a _ViewImport.cshtml file in the folder that contains the views or a parent folder.

Register the Tag Helper
The first part of the argument specifies the name of the tag helper classes, with support for wildcards. The second part specifies the name if the assembly in which they are defined.
Using a Tag Helper
The last step is to use the tag helper in the view, so it can transform the element.

Using a Tag Helper
If you start the application and click on create, you will see the red Add button.

Broadening the scope of a tag helper means you don’t have to create tag helpers that repeat the same operation on different element types. Some care is required because it is easy to create a tag helper that will start matching elements too broadly in the future as the contents of the views in the application evolve. A more balanced approach is to apply the HtmlTargetElement attribute multiple times, specifying the complete set of elements that will be transformed as a combination of narrowly defined matches.

Add multiple HtmlTargetElement attributes
Ordering Tag Helper Execution
As a general rule, it is a good idea to use only one tag helper on any given HTML element. That’s because it is easy to create a situation where one tag helper tramples on the transformation applied by another, overwriting attributes values or content. If you do need to apply multiple tag helpers, then you can control the sequence in which they execute by setting the Order property, which is inherited from the TagHelper base class. Managing the sequence can help minimize the conflicts between tag helpers, although it is still easy to encounter problems.
Advanced Tag Helper Features
In the following sections, I will show you some neat advanced features to get the best out of tag helpers.
Creating Shorthand Elements
Tag helpers are not restricted to transforming the standard HTML elements and can also be used to replace custom elements with commonly used content. This can be a useful feature for making views more concise and making their intent more obvious.

Adding your own HTML element
The WolfgangsButton element isn’t part of the HTML specification and won’t be understood by browsers. Instead, I am going to use this element as a shorthand for generating the button elements that the form requires.
When dealing with custom elements that are not part of the HTML specification, you must apply the HtmlTargetElement attribute and specify the element name. The convention of applying tag helpers to elements based on the class name works only for standard element names.
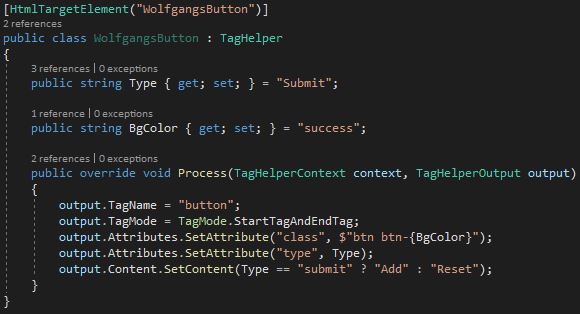
The new Tag Helper to transform WolfgangsButton
The Process method uses the properties of the TagHelperOutput object to generate a completely different element: the TagName property is used to specify a button element, the TagMode property is used to specify that the element is written using start and end tags, the Attributes. SetAttribute method is used to define a class attribute with Bootstrap styles, and the Content property is used to set the element content.
Note that I set the type attribute on the screenshot above. This is because any attribute for which there is a property defined by a tag helper is omitted from the output element. This is usually a good idea because it stops the attributes used to configure tag helpers from appearing in the HTML sent to the browser. However, in this case, I used the type attribute to configure the tag helper, and want it to be present in the output element as well.
Setting the TagName property is important because the output element is written in the same style as the custom element by default. Since I want the output element to contain content, I have to explicitly specify the TagMode.StartTagEndTag enum value so that separate start and end tags are used. The Content property returns an instance of the TagHelperContent class, which is used to set the content of elements. The following table describes the most important TagHelperContent methods:
| Name | Description |
| SetContent(text) | This method sets the content of the output element. The string argument is encoded so that it is safe for inclusion in an HTML element. |
| SetHtmlContent(html) | This method sets the content of the output element. The string argument is assumed to be safely encoded. Use with caution. |
| Append(text) | This method safely encodes the specified string and adds it to the content of the output element. |
| AppendHtml(html) | This method adds the specified string to the content of the output element without performing any encoding. Use with caution. |
| Clear() | This method removes the content of the output element. |
Prepending and Appending Content and Elements with Tag Helpers
The TagHelperOutput class provides four properties that make it easy to inject new content into a view so that it surrounds an element or the element’s content.
| Name | Description |
| PreElement | This property is used to insert elements into the view before the target element. |
| PostElement | This property is used to insert elements into the view after the target element. |
| PreContent | This property is used to insert content into the target element, before any existing content. |
| PostContent | This property is used to insert content into the target element, after any existing content |
Inserting Content around the Output Element
The first TagHelperOutput properties are PreElement and PostElement, which are used to insert elements into the view before and after the output element.
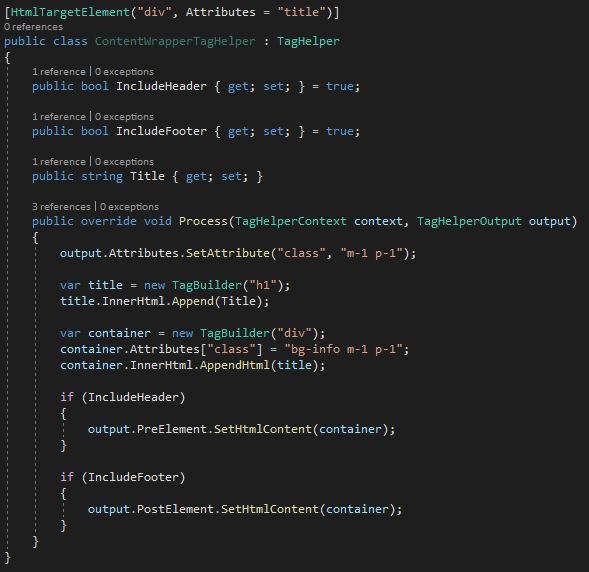
The content wrapper implementation
This tag helper transforms div elements that have a title attribute, and it works by using the PreElement and PostElement to add a header and a footer element that will surround the output element. When generating new HTML elements, you can use C# string formatting to create the content you require, but this is an awkward and error-prone process for all but the simplest elements. A more robust approach is to use the TagBuilder class, which is defined in the Microsoft.AspNetCore.Mvc.Rendering namespace and allows elements to be created in a more structured manner. The TagHelperContent class defines methods that accept TagBuilder objects, which makes it easy to create HTML content in tag helpers.
This tag helper uses the TagBuilder class to create an h1 element that is contained in a div element that has been styled with Bootstrap classes. There are optional bool include-header and include-footer attributes used to specify where the content is injected, and the default is to add elements before and after the output element.
Adding surrounding content
Next, I add a div tag around the RenderBody method.

Preparing the RenderBody tag to render my element before and after it
Inserting Content inside the Output Element with Tag Helpers
The PreContent and PostContent properties are used to insert content inside the output element, surrounding the original contents.
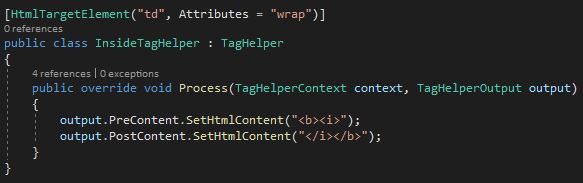
Tag Helper to insert content inside of an element
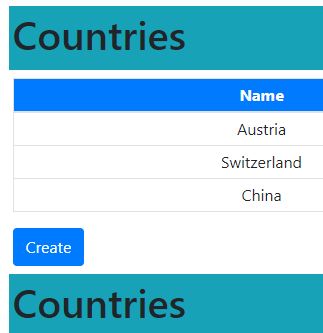
This tag helper operates on the td elements with the wrap attribute and inserts b and i elements around the output element’s content. If you run the application, you will see that the first column of cells in the table that lists the Country objects is shown in bold and italic.
Conclusion
In this post, I showed how to transform HTML elements according to your desires using tag helpers. Then I talked about creating your own elements and also transforming then. Lastly, I added content around and inside elements. There are even more interesting topics about tag helpers like dependency injection or working with view models.
For more details about the configuring ASP.NET Core, I highly recommend the book “Pro ASP.NET Core MVC 2“. You can find the source code for this demo on GitHub.
Comments powered by Disqus.