

Every .NET Core web application has a Program class with a static Main method.
The Startup class of .NET core is the new version of the Global.asax file. This class is responsible for starting the application. The most important part of it is .UseStartup
The Startup class has two methods, ConfigureServices and Configure, that tell ASP.NET Core which features are available and how they should be used.
You can find the source code for this demo on GitHub.
When the ASP.NET Core starts, the application creates a new instance of the Startup class and calls the ConfigureServices method to create its services. After the services are created, the application calls the Configure method. This method sets up middlewares (the request pipeline) which are used to handle incoming HTTP requests. Examples for middlewares are logging and authentication.
Adding MVC functionality in the Startup class
To enable the MVC functionality, you have to add MVC service to your service collection and a default route to your application. This can be done with services.AddMvc() (optional with a specific version) and app.UseMvcWithDefaultRoute(). That’s already enough to start your web application.
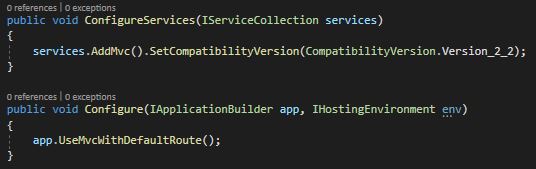
Add MVC functionality to the web application
The add.MVC() method sets up every service that MVC needs. There is no need to add every needed service and therefore the configuration of your application stays small and simple.
Taking a closer look at the Configure Method of the Startup class
The Configure method has two parameters of type IApplicationBuilder and IHostingEnvironment. The IApplicationBuilder is used to set up the functionality of the middleware pipeline whereas the IHostingEnvironment enables the application to differentiate between different environment types, for example, testing and production.
Using the Application Builder
Almost every application will use the IApplicationBuilder because it is used to set up the MVC or your custom middlewares. Setting up the MVC pipeline can be done by using UseMvcWithDefaultRoute or with UseMvc. The first method will set up with a default route, containing {controller}/{action}/{id?}. UseMvc can be used if you want to set up your own routes using lambda expressions.
Usually, applications use the UseMvc method, even if the routes look the same as the default route. This approach makes the used routing logic more obvious to other developers and easier to add new routes later.
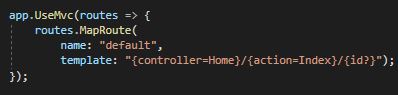
Adding a the default route with UseMvc
MVC also sets up content-generating middleware, therefore your custom middlewares should be registered first and the MVC one last.
Using the Hosting Environment
The IHostingEnvironment interface provides the following properties and information about the hosting environment:
| Name | Description |
| ApplicationName | This returns the name of the application which is set by the hosting platform. |
| EnvironmentName | This string describes the current environment, for example, test or production. |
| ContentRootPath | This property returns the path that contains the application’s content and configuration files. |
| WebRootPath | The string which specifies the location of the container for static content. Usually, this is the wwwroot folder. |
| ContentRootFileProvider | This property returns an object that implements the IFileProvider interface and that can be used to read files from the folder specified by the ContentRootPath property. |
| WebRootFileProvider | This property returns an object that implements the IFileProvider interface and that can be used to read files from the folder specified by the WebRootPath property. |
The ContentRootPath and WebRootPath might be interesting properties but are not needed in most real-world applications because MVC provides a built-in middleware which can be used to deliver static content.
Probably the most important property is EnvironmentName because it allows you to modify the configuration of the application based on the environment in which it is running. There are three conventional environments: development, staging, and production. You can set the current hosting environment by setting an environment variable called ASPNETCORE_ENVIRONMENT.
You can set this variable by selecting ConfiguringAppsProperties from the Visual Studio Project menu and switching to the Debug tag. There double-click the Value field of the environment variable and change it, for example, to Staging. It is common practice to use Staging but the value is not case-sensitive, so you could also use staging. Additionally, you can use every name you want, these previously mentioned ones are only conventional ones.
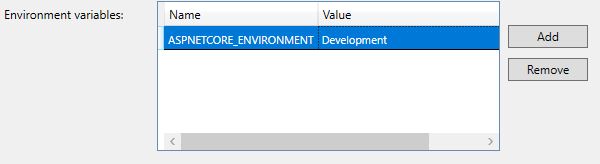
Setting the environment variable to Development
You can use IHostingEnvironment.EnvironmentName in the Configure method to determine which hosting environment is being used. Also, you could use one of the extension methods of IHostingEnvironment:
| Name | Description |
| IsDevelopment() | Returns true if the hosting environment name is Development. |
| IsStaging() | Returns true if the hosting environment name is Staging. |
| IsProduction() | Returns true if the hosting environment name is Production. |
| IsEnvironment(env) | Returns true if the hosting environment name matches the variable. |
On the following screenshot, I set up all my custom middlewares only if the application is running on the Development environment. This is useful for gathering debugging or diagnostic information.
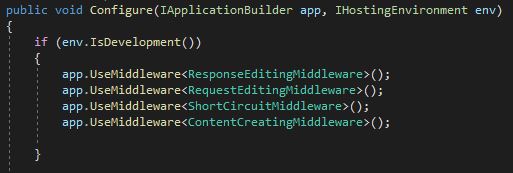
Register the middleware only if the hosting environment is Development
In production, none of these middlewares would be added.
Configuring Exception Handling in the Startup class
In a classic ASP.NET MVC application, you had to configure the exception handling in the web.config. The custom error section there often was configured to show detailed error pages and was changed to hide an exception and redirect on an error page on the production environment.
With ASP.NET Core, you can easily configure this using the IHostingEnvironment and a built-in exception handler middleware.
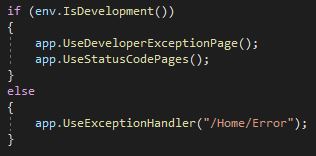
Configure exception handling depending on the hosting environment
The UseStatusCodePages method adds descriptive messages to responses that contain no content, such as 404 – Not Found responses, which can be useful since not all browsers show their own messages to the user. The UseDeveloperExceptionPage method sets up an error-handling middleware component that displays details of the exception in the response, including the exception trace. This isn’t information that should be displayed to users, so the call to UseDeveloperExceptionPage is made only in the development hosting environment, which is detected using the IHostingEnvironmment object.
On any other environment, the user gets redirected to /Home/Error. You can create the Error action in the Home controller and display a nice error page to the user, providing some helpful information.
Enabling Browser Link
Browser Link is a feature in Visual Studio that creates a communication channel between the development environment and one or more web browsers. You can use Browser Link to refresh your web application in several browsers at once, which is useful for cross-browser testing.
The server-side part of Browser Link is implemented as a middleware component that must be added to the Startup class as part of the application configuration, without which the Visual Studio
integration won’t work. Browser Link is useful only during development and should not be used in staging or production because it edits the responses generated by other middleware components to insert JavaScript code that opens HTTP connections back to the server side so that it can receive reload notifications.
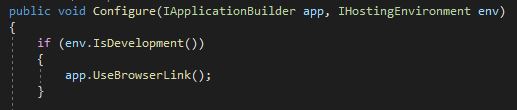
Enable Browser Link
You also have to install the Microsoft.VisualStudio.Web.BrowserLink NuGet package.
Enabling Static Content
The UseStaticFiles method adds a short-circuiting middleware which provides access to the files in the wwwroot folder so that the application can load images, JavaScript and CSS files.

Enable static content
I can’t think of an application which doesn’t need static content, no matter of the environment it is running in. Therefore, I add it for all environments. This change will also make the default page work since it is loading the necessary CSS files now.
Conclusion
In this post, I showed different ways to configure your application using the Startup class. I talked about adding static content, exceptions and environment specific configurations
For more details about the Startup class, I highly recommend the book “Pro ASP.NET Core MVC 2“. You can find the source code for this demo on GitHub.
Comments powered by Disqus.