Kubernetes is a great tool but it also has a steep learning curve. Today, I want to talk about how to limit the resources a container can use and how containers can request a minimum of resources on a node in the Kubernetes cluster.
This post is part of “Microservice Series - From Zero to Hero”.
Resource Requests vs. Resource Limits
Resource requests describe how many resources, for example, CPU or RAM a node has to have. If a node doesn’t satisfy the requests of the container, the container (more precisely the pod) won’t be scheduled on it. If no node satisfies the request in your cluster, the pod won’t be scheduled at all.
Resource limits describe how many resources, for example, CPU or RAM, a pod can use. For example, if the resource limit is set to 512MB RAM, the pod can only use 512 MB of RAM, even if it needs more, it won’t get more. This is important to prevent a pod go haywire and using all the resources of your node. Additionally, without a resource limit set, Kubernetes can’t perform auto-scaling of your pods. I will describe how auto-scaling using the horizontal pod autoscaler works in my next post, Auto-scale in Kubernetes using the Horizontal Pod Autoscaler.
Pods are the smallest unit that can be created in Kubernetes. If a pod contains multiple containers, the resource requests of all containers are added up for the pod. Then Kubernetes checks where and whether it can schedule the pod. The resource limit can never be lower than the resource request. If you do so, Kubernetes won’t be able to start the pod.
Resource and request limits can be set on a container or namespace level. In this post, I will only demonstrate the container-level approach. The namespace level approach works the same way though.
Units for Resource Requests and Limits
CPU resources are defined in millicores. If your container needs half a CPU core, you can define it as 500m or 0.5. You will later see that Kubernetes converts 0.5 to 500m. Make sure to never request more CPU cores than your biggest node has. Otherwise, Kubernetes won’t be able to schedule your pod. It is a best practice to use 1 CPU core (1000m) or less for your pod except if you have a specific use case where your application can use more than one CPU core. It is usually more effective to scale out (create more pods) rather than use more CPU power.
When your pod hits the CPU limit, Kubernetes will throttle the pod. This means that it restricts the CPU the pod can use. This may lead to worse performance of your application, but it prevents it from being evicted.
Memory is defined in bytes. The default value is mebibyte which equals more or less a megabyte. You can configure anything from bytes up to petabytes. If you request more RAM than your biggest node has, Kubernetes will never schedule your pod.
Unlike the CPU limit, when you hit the RAM limit, Kubernetes won’t be able to throttle the memory usage of the container. Instead, it will terminate the pod. If the pod is managed by a controller like a DeamonSet or Deployment, the controller will tell Kubernetes to create a new pod to replace the terminated one.
Configure Resource Request Limits in Helm for a Container.
You can find the code of the demo on GitHub.
In my previous posts, I created two microservices and used Helm charts to deploy them to Kubernetes. For more information on the implementation see “Microservice Series - From Zero to Hero”.
By default, Helm adds an empty resources section to the values.yaml file. This means that no resource request or limit is set.
Uncomment the code and remove the empty braces. Then set values for the limits and requests, for example:
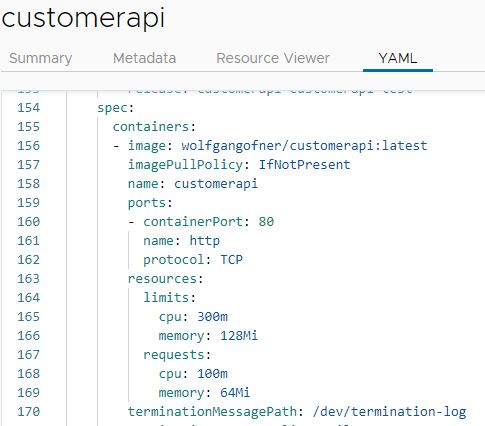
This code configures that a container requests 100 millicores (0.1 CPU core) and 64 MB of RAM. It also limits the resources to a maximum of 128 MB RAM and 0.3 CPU cores. You will later see that Kubernetes converts these 0.3 CPU cores to 300m.
That’s all you have to configure because Helm adds the reference to the values file automatically to the container section in the deployment.yaml file.
Now you can deploy your application and check if the resource values are set correctly. If you want to learn how to deploy the Helm charts to Kubernetes, check out my post Deploy to Kubernetes using Helm Charts.
Test that the configured Resource Values are set
You can use kubectl or a dashboard to check if the resource values are set correctly. For more information about using a dashboard, see my post Azure Kubernetes Service - Getting Started.
Conclusion
Resource limits should always be set to make sure that a pod can’t eat up all the resources of your Kubernetes node. Without resource limits set, Kubernetes won’t be able to automatically scale your pods using the horizontal pod autoscaler. I will show in my next post, Auto-scale in Kubernetes using the Horizontal Pod Autoscaler, how to use it to make your application more resilient and perform better under heavy load.
Resource requests allow you to configure how many resources like CPU and RAM a node has to have available. Always make sure that you don’t configure too much RAM or CPU, otherwise, your pod will never be scheduled.
You can find the code of the demo on GitHub.
This post is part of “Microservice Series - From Zero to Hero”.


Comments powered by Disqus.