

I showed in my last post how to use SSDT to create a dacpac package and how to deploy it locally. The SSDT project uses .NET Framework 4.8 which means that it runs only on Windows. Azure DevOps has a task to deploy dacpac packages, but it also only supports Windows. To be able to use a Linux environment, I will create a .NET Core project to build the dacpac package and build my own Docker container with the sqlpackage installed to deploy the dacpac to an SQL Server.
This post is part of “Microservice Series - From Zero to Hero”.
Use .NET Core to create the Dacpac Package
You can find the code of the demo on GitHub.
I have created a new folder in my solution, Database, which contains the SQL project. To build this project in a Linux environment, I add a new .NET Core 3.1 Class Library called CustomerApi.Database.Build. Next, I replace the SDK type with MSBuild.Sdk.SqlProj/1.11.4 and set the SQLServerVersion SqlAzure because I want to deploy it to an Azure SQL database.
This references the MSBuild.Sdk.SqlProj project which can be found on GitHub. Unfortunately, this project doesn’t support .NET 5 yet, that’s why I use .NET Core 3.1.
Add Scripts to the Deployment Project
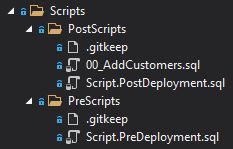
The created Dacpac package should execute SQL scripts before and after the deployment. To achieve that, I create a folder Scripts which contains two subfolders called, PostScripts and PreScripts. The folders contain the Script.PostDeployment, respectively the Script.PreDeployment script.
Structure of the scripts
These scripts contain all SQL scripts which should be executed. The PostScripts folder contains the 00_AddCustomers script and therefore, I have added it to the Script.PostDeployment file.
Additionally, I have to add the following code to the .csproj file:
This code configures the execution of the scripts before and after the deployment.
Be aware that the scripts are executed every deployment. If your script inserts data, you have to make sure that it checks the data before it inserts it. I am using a merge statement to update existing data or create it if it doesn’t exist. This script looks complicated but is quite simple.
Add Tables to the Deployment Project
Lastly, I have to add the tables for my database. You can either add the SQL script in the root folder, or you can reference the SSDT project. Since I am lazy, I reference the SSDT project with the following code in the .csproj file
This adds the Tables folder with the Customer table to the solution.

Referencing the tables
Finished Project and Build Problems
The finished .csproj file looks as follows:
If you get an error building the project, add the following code to the MSBuild.exe.config:
You can find the file under C:\Program Files (x86)\Microsoft Visual Studio\2019\Enterprise\MSBuild\Current\Bin (The path will vary, depending on your version, e.g. Professional, Enterprise, etc.). This is a known MSBuild bug which exists for around a year already.
Build the Database Project in the Dockerfile to create a Dacpac Package
After the database build project is finished, it is time to include it in Dockerfile so it gets built in the CI/CD pipeline. The Dockerfile is located in the CustomerApi folder and contains already all statements to build the projects and run the tests. First, add a copy statement to copy the project inside the container:
Next, add the following section:
This code creates an intermediate container and labels it so you can access it later. Additionally, it builds the project and generates the dacpac package this way. If you were following this series, then you have seen the same method to collect the test results and code coverage.
Upload the Dacpac Package
After building the Dacpac package, you have to extract it from the Docker container and upload it as the build artifact. This is done in the DockerBuildAndPush template which is located under pipelines/templates. Add the following code after the PublishCodeCoverage task:
This code takes a container with the dacpac label and extracts the dacpac file (This is the same as the extraction of the code coverage and test results). Then it uploads (publishes) it for the Azure DevOps agent.
Create a Linux Container to Deploy the Dacpac package
The Azure DevOps team has an open GitHub issue from 2018 about deploying dacpac on Linux. Unfortunately, we haven’t gotten any news if and when they will implement it. Therefore, I will use a Linux Docker container with sqlpackage installed to deploy the database. The Dockerfile was originally created by a colleague of mine. I have created a new folder, Infrastructure, in the root folder and added the Dockerfile there.
I also have uploaded the container to Docker Hub and will use it in the CI/CD pipeline.
Deploy your Database using the Dacpac Package
To deploy the dacpac package to the database, you should use a deployment task in your CI/CD pipeline. This task runs as a container job using the previously mentioned Linux container with the sqlpackage installed. This deployment also runs only after the build succeeded and only if the build reason is not a pull request The code for that looks as follows:
This deployment executes the DatabaseDeploy template which takes two parameters, connectionString, and dacpacPath. The template looks as follows:
The deployment downloads the previously published dacpac artifact and then executes a sqlpackage publish with the connection string to the database and the path of the dacpac package.
Testing the Database Deployment
I added the database deployment also to the OrderApi. You can find the code of the demo on GitHub.
Before you can run the pipelines, you have to replace the content of the SQLServerName variable with your server URL:
Additionally, you have to add the DbUser and DbPassword variables in the pipeline. You can add the DbUser variable as a normal variable if you want. The DbPassword variable must be added as a secret variable though, otherwise, everyone can see the password.

Add secret variables to your pipeline
Run both (CustomerAPi and OrderApi) pipelines and you should see both databases deployed on your database server.

Deploying the database in the CI-CD pipeline

The databases got deployed on the server
Conclusion
Dacpac is great to automate the database deployment including schema updates and the execution of scripts. Currently, the deployment is only supported on Windows but with a bit of tweaking, I was able to use .NET Core 3.1 and my own Linux Docker container to build and deploy it using Linux. Setting up everything is a bit of work but after you have done it once, you can easily copy and paste most of it into future projects.
You can find the code of the demo on GitHub.
This post is part of “Microservice Series - From Zero to Hero”.
Comments powered by Disqus.