

Dependency Injection is a technique that helps to create flexible applications and simplifies unit testing. .NET Core brings dependency injection out of the box, therefore you don’t have to use any third party tools like Autofac or Ninject anymore.
Setting up the Demo Application
You can find the source code of the following demo on GitHub.
I created a repository which will provide basic operations for my Customer class like Add and Delete.
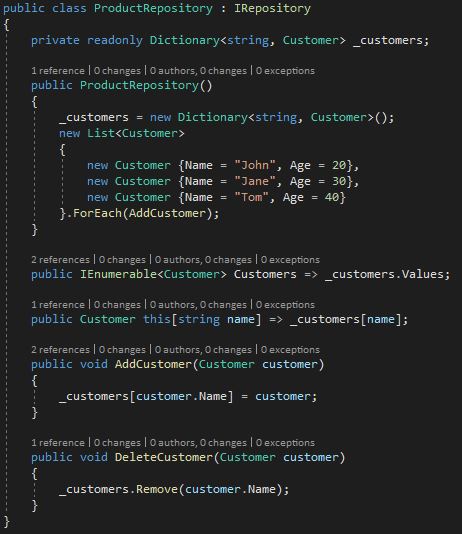
Setting up a repository class for basic operations
Next, I created a view which will display the customer’s name and age in a table.
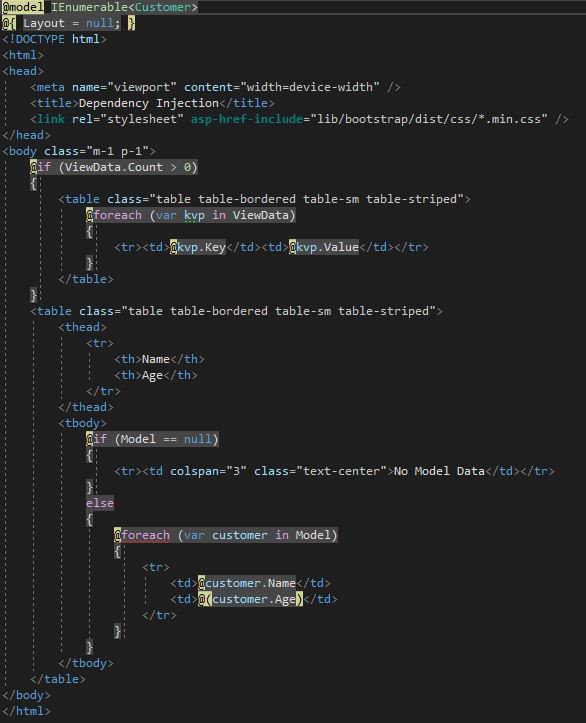
The view to display the customer data
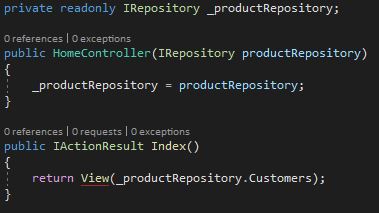
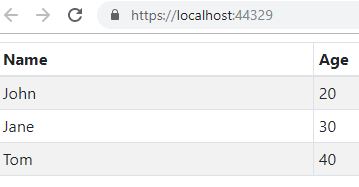
Lastly, I call this view from the controller with the CustomerRepository creating some data.

Hard-coding the usage of the CustomerRepository in the controller
The CustomerRepository is hard-coded into the controller. This means that if you want to call the view with a different repository, you have to change the code and recompile it. Also, unit testing is really hard if you don’t have any interfaces to fake. This is where dependency injection comes in handy.
Preparing for Dependency Injection
The term dependency injection (DI) describes an approach to creating loosely coupled components, which are used automatically by MVC. This means that controllers and other components don’t need to have any knowledge of how the types they require are created. Dependency injection might seem abstract in the beginning but let’s take a look at the modified HomeController:
Preparing the Home Controller for dependency injection
I am passing an IRepository object to the constructor of the class. From now on the class doesn’t have to care to get the right object. The right object will be passed. This behavior is also known as the Hollywood Principle. The only problem with this code is, that nobody tells MVC which object to pass as the IRepository and therefore it passes null which will lead to an exception.

Exception when starting the application
In the next section, I will configure MVC, so it knows which object it should inject as IRepository.
Hollywood Principle
The Hollywood Principle says: “Don’t call us, We will call you”. This means don’t do anything until further notice. In a more technical term: don’t instantiate an object yourself and do work with it, wait until someone calls you with an object on which you can do your operation.
For example, I have a calculator class which logs all the steps of the calculation. Instead of instantiating the logger itself, the calculator class expects an ILogger interface which it will use to log. If I want to use this calculator class now, I provide it with my logger. This can be a file logger, a console logger or a database logger. The class doesn’t care about. All it does is ILogger.Log(“My log message”). This behavior makes the classes loosely coupled which means they can be extended and tested (most of the time) easily.
Configuring the Service Provider
In the previous section, I added the IRepository interface to the Home controller but it ended in an exception. To fix this problem, all you have to do is the following line to the ConfigureServices method of the Startup class:
services.AddTransient<IRepository, ProductRepository>();

Register the IRepository interface as ProductRepository
There are three different Methods to register a service, depending on its scope:
- Transient
- Scoped
- Singleton
I will explain the differences in the section “Understanding Service Life Cycles”. For now, add the line and that’s all you have to do to fix the previous exception.
The application works again
Using Dependency Injection for Concrete Types
Dependency injection can also be used for concrete types, which are not accessed through interfaces. While this doesn’t provide the loose-coupling advantages of using an interface, it is a useful technique because it allows objects to be accessed anywhere in an application and puts concrete types under lifecycle management.
In the following example, I created a new WeatherService class and added it to the Home controller. There, I created a new action which returns only the string provided by the service. It is not the most useful implementation but it shows how it works.
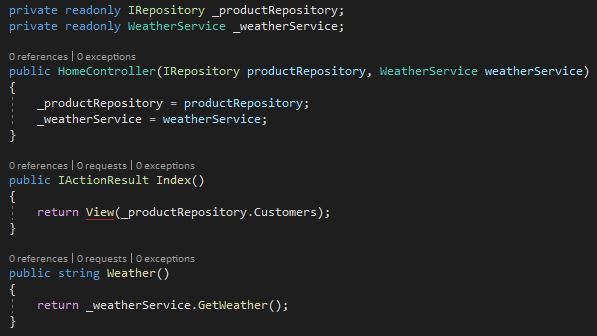
Adding the weather service to the Home controller
Next, I register the WeatherService in the Startup class. Since there is no mapping between a service type and an implementation type in this solution, you have to use an override of the AddTransient method which accepts a single type parameter that tells the service provider that it should instantiate the WeatherService class to resolve a dependency on this type.

Register the WeatherService in the Startup class
The advantages of this approach are that the service provider will resolve any dependencies declared by the concrete class and that you can change the configuration so that more specialized sub-classes are used to resolve dependencies for a concrete class. Concrete classes are managed by the service provider and are also subject to lifecycle features, which I will talk about in the next section.
If you call the new action, you will see the weather information provided by the WeatherService.
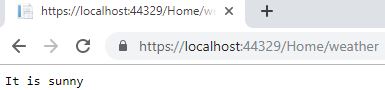
Getting data from the weather service
Understanding Dependency Injection Service Life Cycle
In the last example, I added a dependency using the AddTransient method. This is one of four different ways that type mappings can be defined. The following table shows the extension methods for the service provider dependency injection:
| Name | Description | ||||||||||||||||||||
| AddTransient<service, implType>() | This method tells the service provider to create a new instance of the implementation type for every dependency on the service type. | ||||||||||||||||||||
AddTransient| This method is used to register a single type, which will be instantiated for every dependency. </tr> | AddTransient | This method is used to register a factory function that will be invoked to create an implementation object for every dependency on the service type. </tr> | AddTransient | These methods tell the service provider to reuse instances of the implementation type so that all service requests made by components associated with a | common scope, which is usually a single HTTP request, share the same object. These methods follow the same pattern as the corresponding AddTransient methods. </tr> AddSingleton<service, implType>() or AddSingleton | These methods tell the service provider to create a new instance of the implementation type for the first service request and then reuse it for every subsequent service | request. </tr> AddSingleton | This method provides the service provider with an object that should be used to service all service requests. </tr> </table> </div> ### Using the Transient Life Cycle The simplest way to start using dependency injection is to use the AddTransient method, which tells the service provider to create a new instance of the implementation type whenever it needs to resolve a dependency. The transient life cycle incurs the cost of creating a new instance of the implementation class every time a dependency is resolved, but the advantage is that you don’t have to worry about managing concurrent access or ensure that objects can be safely reused for multiple requests. In my experience, the transient life cycle is used for most of the applications. #### Using a Factory Function One version of the AddTransient method accepts a factory function that is invoked every time there is a dependency on the service type. This allows the object that is created to be varied so that different dependencies receive instances of different types or instances that are configured differently. To demonstrate this behavior, I extended the ConfigureServices method of the Startup class. First, I inject an IHostingEnvironment object which indicates on which environment the application is running. Afterward, I check this variable and if it is development, I instantiate a ProductRepository as IRepository. Otherwise, I instantiate a CustomerRepository. |  Instantiate the IRepository interface depending on the hosting environment  Adding a scoped dependency  Adding a singleton dependency  Using action injection
 Resolve an object manually |
Comments powered by Disqus.