Running microservices in Kubernetes usually requires a cluster running in the cloud or on-premise. During the development or when debugging, developers often need to run their application quickly in Kubernetes. Spinning up a new cluster or configuring the deployment to an existing one might take longer than the time they actually need the cluster.
The solution to this problem is to run Kubernetes locally on your development machine using Docker Desktop.
This post is part of “Microservice Series - From Zero to Hero”.
Installing Kubernetes locally
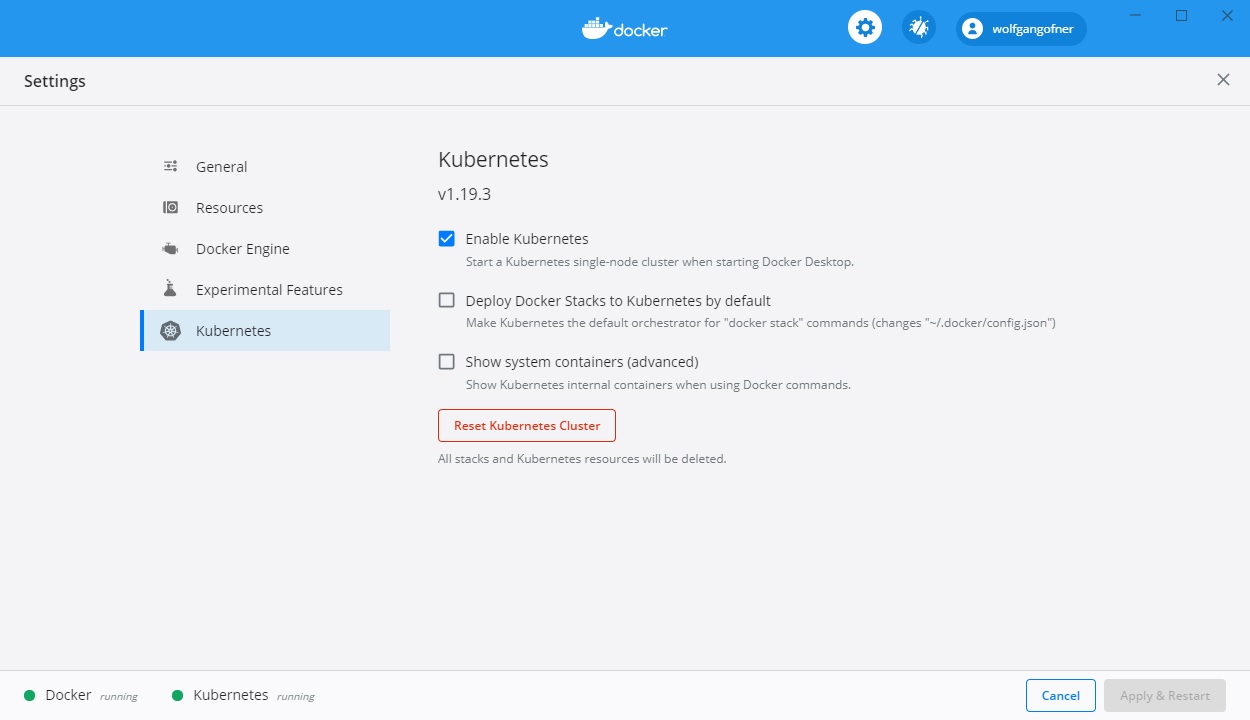
To run your microservice in Kubernetes on your Windows developer computer, you have to install Docker Desktop first. After you installed it, open the settings and go to the Kubernetes tab. There you click on Enable Kubernetes.
Applying this setting restarts Docker. It may take a couple of minutes but once it’s back up, you have Docker and Kubernetes with one node running.
Deploy a Microservice to your local Kubernetes
Deploying an application to a local Kubernetes works exactly the same way as if Kubernetes was running in the cloud or in your local network. Therefore, I will use Helm to deploy my microservice.
Configure the Kubernetes Context
Before you start, make sure that you have selected the right context of your local Kubernetes. To check the context, right-click on the Docker tray and hover over the Kubernetes tab. By default, the local Kubernetes context is called docker-desktop. If it is not selected, select it. Otherwise, you won’t deploy to your local Kubernetes cluster.
Deploy a Microservice with Helm
You can find the code of the demo on GitHub. If you don’t know what Helm is or if you haven’t installed it yet, see Helm - Getting Started for more information.
To deploy the microservice, open the demo application and navigate to the Helm chart of the CustomerApi. You can find it under CustomerApi/CustomerApi/charts. The chart is a folder called customerapi. Deploy this chart with Helm:
The package gets deployed within seconds. After it is finished, connect to the dashboard of your cluster. If you don’t know how to do that, see my post Azure Kubernetes Service - Getting Started. There I explain how I use Octant and how to access your Kubernetes cluster with it.
Testing the Microservice on the local Kubernetes Cluster
Open the Services tab and you will see the customerapi service with its external IP “localhost” and port 80.
This means that you can open your browser, enter localhost and the Swagger UI of the CustomerApi microservice will be loaded.
Change the Port of the Microservice
If you want to change the port your microservice is running on, open the values.yaml file inside the customerapi folder. Change the port in the service section from 80 to your desired port, for example, 22334.
If you already have the microservice deployed, use helm upgrade to re-deploy it with the changes, otherwise use helm install.
After the package is installed, open your browser and navigate to localhost:22334 and the Swagger UI will be displayed.
Conclusion
Kubernetes is awesome but it can get complicated to test small changes in a cluster. Docker Desktop allows you to install a Kubernetes cluster locally. Combined with Helm, a developer can deploy a microservice to a local Kubernetes cluster within minutes and test the application.
You can find the code of the demo on GitHub.
This post is part of “Microservice Series - From Zero to Hero”.


Comments powered by Disqus.