Routing in ASP.NET MVC can be a really complex topic. In this post, I want to present the most used URL Patterns and explain how they work.
Routing with Routes
Routes can be created by adding them to the RouteCollection or by decorating actions or controller with attributes. In this section, I will show different approaches how to build a route and adding it to the RouteCollection. Adding a route happens in the RouteConfig class in the App_Start folder at the start of the application.
Default route
The ASP.NET MVC framework comes out of the box with a default route. The template also displays the property names of the route attributes, so it is easier for a beginner to understand what’s going on. Let’s have a look at the default route:
Every route has a unique name. The name of the default route is Default. The url attribute describes the pattern of the url. The default pattern is Controller/Action/Id. The defaults property sets default properties for the controller, action and sets the id as optional. The default values are used when no values for the attribute is passed. Valid URLs for this route are for example:
- /
- /Home
- /Admin
- /Home/Index
- /Home/Index/123abc
- /Home/Index/abc
The names of the properties (name, url and defaults) are grayed out because they are not needed. They are there only for an easier understanding, especially for beginners.
Additionally to the default route, the ASP.NET template implements routes.IgnoreRoute(“{resource}.axd/{*pathInfo}”);. You should keep this rule to prevent ASP.NET MVC from trying to handle .axd files. These files don’t exist physically and therefore are handled by an HttpHandler.
Simple route
Now it’s time to implement our own routes. The simplest route takes a controller and an action with no defaults or additional parameters.
If the user types into his browser myurl.com/Home/Index the Index action in the Home controller is called. If the user only enters /Home the route won’t find a suiting action because no default action is defined.
Static route segments
ASP.NET MVC also offers the possibility of static route segments. This means that if the route contains a certain word that a specific controller and/or action are called.
The screenshot above shows three different variations of a static segment in the route. The first route calls the ShowArchievePosts action in the Posts controller when the user enters /Blog/Archive. The second route calls an action entered in the Posts controller when the user enters/Blog/ActionName.
The third route is selected when the user input starts with /InternalBlog. If the user doesn’t enter anything else the default controller and action are called. The user can also enter a controller or a controller and an action.
Another possibility to add a static part to a route is to prefix the controller or action as part of its name.
This route is matched when the controller begins with External. This means that the URL /ExternalHome/Index would call the Index action in the Home controller.
Route ordering
Now it gets a bit trickier. The routes are added to the RouteCollection as they appear in the RegisterRoutes method. After the user entered a URL, ASP.NET searches through the RouteCollection until it finds a fitting route. A fitting route does not mean that it leads to the result which the user expects.
Let’s take a look at the two roots from above. The first route is the default route with a default controller and action and the second route has the static segment InternalBlog in front of the controller. What happens if the user enters “/InternalBlog/Posts/Display”? You might think that the second route is selected. But that’s not the case. The entered URL fits the first route where InternalBlog = controller, Posts = action, Display = id. If the application doesn’t have an InternalBlog controller with the Posts action, an error message is displayed.
Custom segment variables
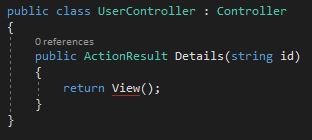
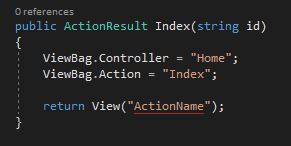
The default route already showed that it is possible to add a variable after the action. For example, the route /Home/Index/123 call the Index action from the HomeController with the parameter 123. The parameter name of the action must match the variable name in the route. Otherwise, it will be null.
The default route sets the id as UrlParameter.Optional which means that this parameter is optional (what a surprise).
Variable amount of segment variables
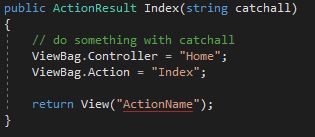
Like params in C#, the routing in ASP.NET MVC offers a feature to take a variable amount of variables. To achieve that use the *catchall keyword.
This allows the user to enable any amount of variables into the URL. A fitting URL would be for example /Home/Index/User/Detail/123. User/Detail/123 would be passed as catchall parameter to the Index action in the HomeController.
The catchall string contains User/Detail/123.
Default values for attributes
I already showed that it is possible to set default values for controller, actions and attributes in the route. It is also possible to set default values for attributes in the action. This is done as in normal C# with variable = defaultValue, for example string id = “1”.
Variable constraints
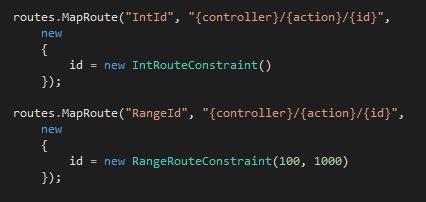
The routing in ASP.NET MVC enables you to restrict the data type and the range of the entered attributes. To restrict a variable to int for example use, variable = new IntRouteConstraint(). There are several classes like FloatRouteConstraint() or AlphaRouteConstraint().
To restrict a variable to a certain range, use the RangeRouteConstraint class, for example variable = new RangeRouteConstraint(min, max).
Restrict HTTP method
Not only controller, actions and variables can be restricted, also the HTTP method can be restricted. To restrict a route to a certain HTTP method use httpMethod = new HttPMethodConstraint(“GET”). Instead of get, you could use any HTTP verb.
Attribute Routing in ASP.NET MVC
Additionally, to creating routes it is possible to decorate controller and actions with route attributes.
Enabling attribute routing
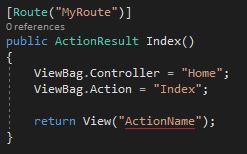
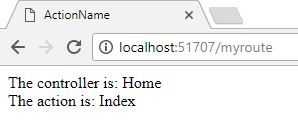
To enable attribute routing you have to add routes.MapMvcAttributeRoutes(); to the RegisterRoutes method. Next, you have to set the route attribute on an action and the desired route, for example [Route(“MyRoute”]). Now you can call your action with /MyRoute
It is also possible to decorate an action with several route attributes.
Attribute routing with variables
With attribute routes, it is also possible to add variables which can be processed in the action as parameters. To declare a variable wrap it in curly brackets. The name in the route must match the name of the parameter, otherwise, the parameter will be null.
Constraints for route attributes
The variables in the route attribute can be restricted to a certain data type. This would be useful for the id. Ids are usually int, so it makes sense to expect an int id. To do that you only have to add the data type after the variable name within the brackets, separated by a colon. Don’t forget to change the data type of the parameter, otherwise ASP.NET won’t match the variable with the parameter.
Routing Static Files
If the user enters a path to a static file, for example, an image or a pdf file, the routing in ASP.NET MVC forwards the user to this file, if it exists.
The mechanisms for routing in ASP.NET MVC searches first the path of the file. Only then it evaluates the routes. To prevent this behavior use set RouteExistingFiles to true.
It is also possible to ignore the routing for a certain file type with routes.IgnoreRoute(path).
The example above shows that routing is ignored for all HTML files in the StaticContent folder. You can use {filename} as a variable for all file names in this directory.
Conclusion
I showed several approaches for routing in ASP.NET MVC using the routing method and using attributes on actions and controllers. Routing is a pretty complex topic and there is way more to about it than what I presented. For more details about routing, I highly recommend the books Pro ASP.NET MVC 5 and Pro ASP.NET MVC 5 Plattform.
I uploaded the source code to GitHub if you want to download it and play a bit around with different routes.







Comments powered by Disqus.