

Kubernetes, when synergized with applications like KEDA (Kubernetes Event-driven Architecture), becomes a powerful tool. KEDA introduces a scaler into your Kubernetes cluster, enabling workload scaling in response to external events. Imagine a scenario where an Azure DevOps job kick-starts, triggering KEDA to activate an Azure DevOps agent.
In this post, I watnt to show you how to deploy an Azure DevOps agent within a Docker container on your local machine, and subsequently onto Kubernetes. We will also explore how to scale down the agent, allowing it to scale out only when pipelines are active in Azure DevOps. This strategy ensures optimal resource utilization within your Kubernetes cluster.
Prepare your Azure DevOps Server
To utilize your own Azure DevOps agent, initial preparation of your Azure DevOps Server is required. This involves creating an agent pool and a Personal Access Token (PAT).
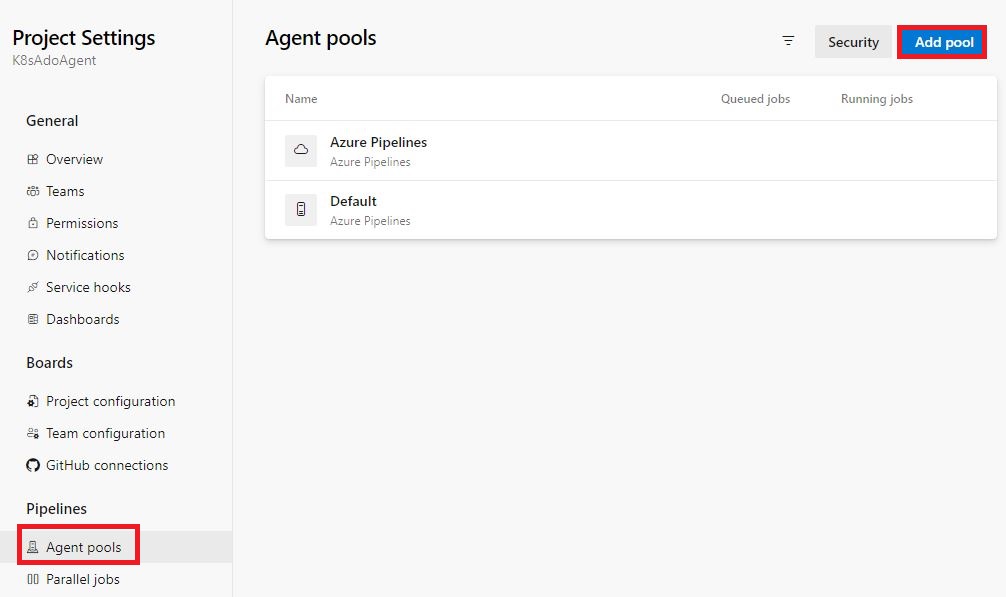
Start by navigating to “Project settings” –> “Agent pools” in your Azure DevOps Server and click on “Add pool”.
Create a new Agent Pool
Next, a pop-up window will appear. Here, select “Self-hosted” as your pool type, provide a name, and select “Grant access permission to all pipelines”. Click on “Create” to finalize the process.

Configure the new Agent Pool
Remember to note down the name as it will be required later when running your Azure DevOps agent.
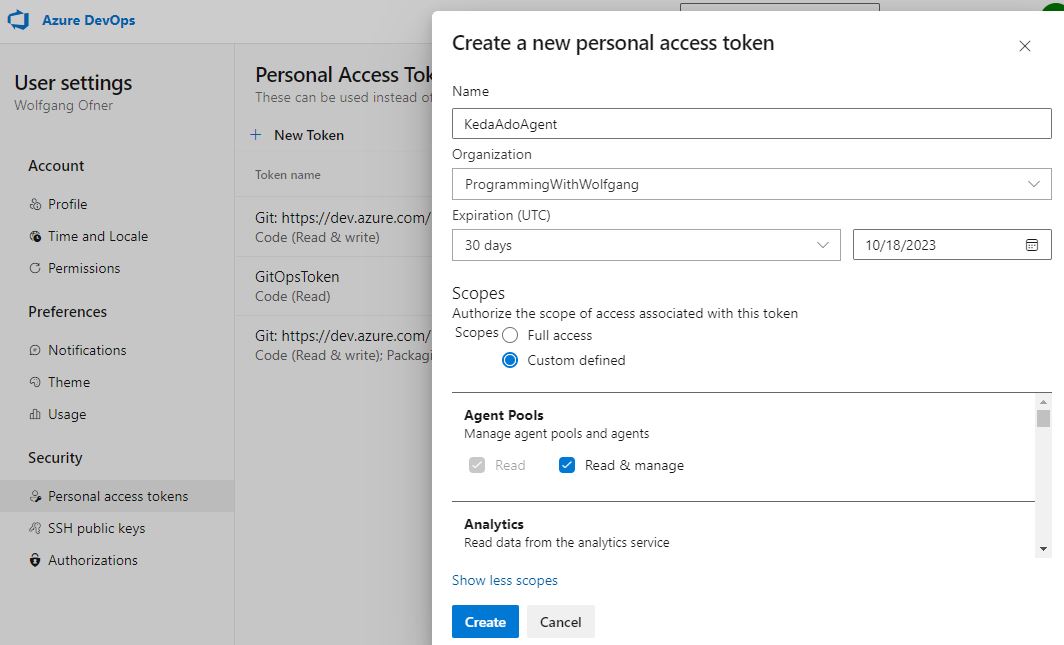
The next step is to create a new Personal Access Token (PAT) to grant the agent access to your server. Click on “User settings” –> “Personal access tokens” and then on “+ New Token”. In the pop-up window, provide a name and assign the “Read & manage” permission for “Agent Pools” to the PAT.
Create a new PAT
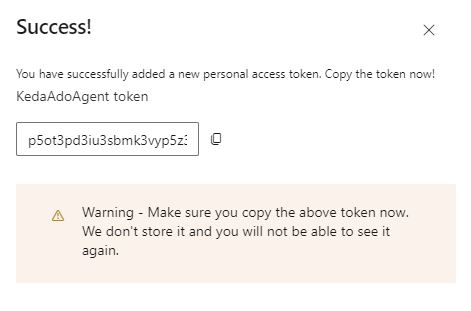
Upon clicking “Create”, the PAT will be displayed. It is crucial to copy the PAT at this stage as it will not be visible again.
Copy the PAT
Finally, create a pipeline to verify that your new Azure DevOps agent is successfully running the pipeline job. The key aspect of the pipeline is that it should use the agent pool you created earlier. Below is a simple pipeline that executes an empty shell script. This pipeline’s sole purpose is to test that the agent is executing the pipeline.
And there you have it! Your Azure DevOps Server is now ready for your Azure DevOps agent.
Run the Azure DevOps Agent locally
You can find the code of the demo on GitHub.
The Dockerfile in the repository is designed to build the Azure DevOps agent, equipped with all necessary software to execute your pipeline. The start.sh file, which is started when you launch the image, configures and initiates the agent. You can add any required software to your pipeline in the Dockerfile.
For instance, I’ve included “wget” to install the .NET 6 and 7 SDK, enabling my agent to build .NET 6 and 7 applications. Here is what the Dockerfile looks like, but feel free to modify it as needed:
Ensure that the start.sh file is saved with the LF (Linux) EOF (End of file) marker. Using the Windows EOF marker will result in a build failure and an unhelpful error message.
After adding all necessary software, build the Dockerfile using the following command and tag it:
Building the Docker image may take a few minutes due to its size.
Once the image is built, launch it using the following command:
Replace everything within <> with your values. After launching the image, the start.sh file downloads the necessary files for the Azure DevOps agent and starts it. The agent is now waiting for a pipeline job to run.

Start the Azure DevOps Agent locally
To test the agent, run your Azure DevOps pipeline and you should see in the console output that the agent picked up the pipeline job and executed it.
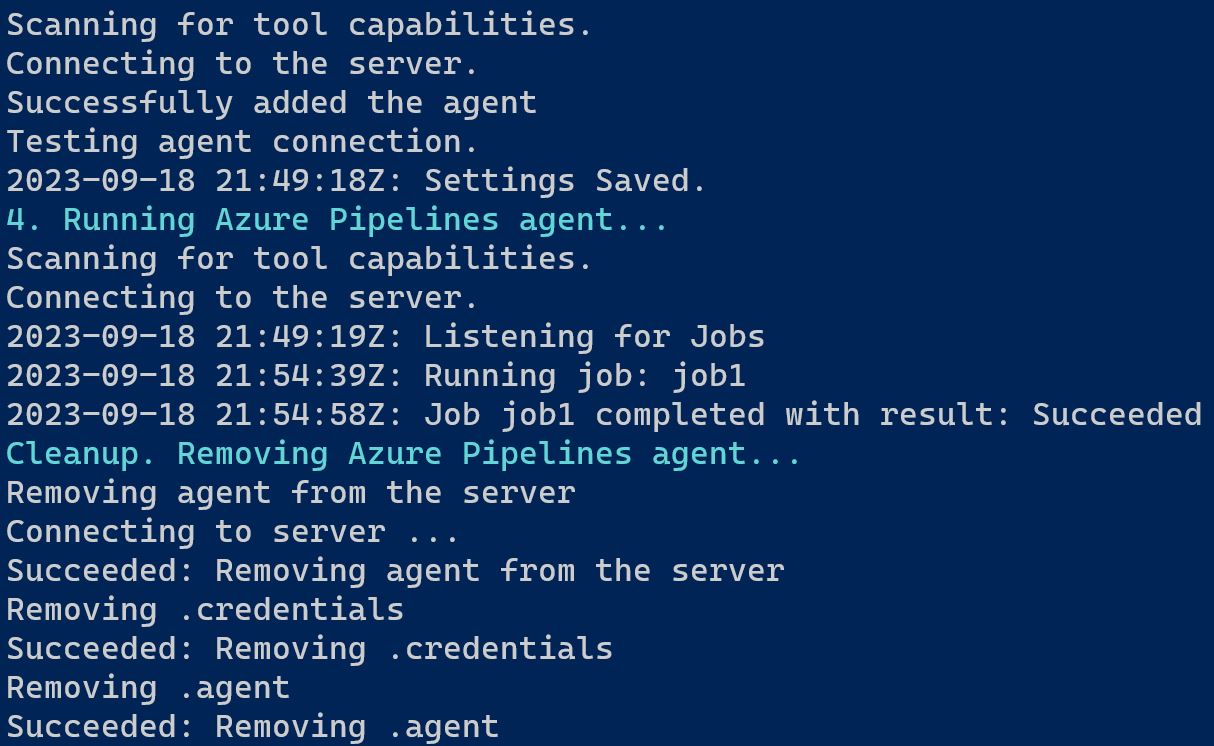
The agent executed the pipeline job successfully
As shown in the screenshot above, the agent picked up the pipeline job, executed it successfully, and then was removed. This means that there is no agent running to execute another job. This is where running the agent in Kubernetes comes in handy, which we will set up in the following sections.
Before you can use your DevOps agent in your Kubernetes cluster, you need to push it to a container registry. If you don’t have a Docker Hub account, create one and then use the following code to tag your image and then push it to the registry:
Replace “wolfgangofner” with your username. Once the image is pushed to the registry, you are ready to set up the Kubernetes cluster and install KEDA.
Setting up the Kubernetes Cluster and KEDA
You can set up your Kubernetes cluster in any environment, but for simplicity, we will create an Azure Kubernetes Service cluster. Use the following command to do so:
This command will create a new resource group and then deploys the AKS cluster within this resource group.
Next, create the KEDA namespace and install KEDA using Helm charts:
For more information on Helm see “Helm - Getting Started” and for more information on KEDA see “KEDA - Kubernetes Event-driven Autoscaling”.
Deploy your Azure DevOps Agent to Kubernetes
To deploy your Azure DevOps Agent to Kubernetes, there are a few limitations of Azure DevOps that we need to navigate, which I’ll discuss in the next section.
Firstly, as Kubernetes Secrets are base64 encoded, you’ll need to encode your PAT. Use the following command, replacing <YOUR_PAT> with your PAT:
To deploy your Azure DevOps agent to Kubernetes, you’ll need a secret that contains the PAT and a deployment that creates the pod for your agent. Save the following code in a file named deployment.yaml (You can find all files on GitHub):
Replace the values of the image you want to use, the URL to your Azure DevOps server, the name of your agent pool, and the ID of your agent pool. I made comments in each line where you have to update a value. Be aware that the ID of the agent pool has to be a string and not a number.
After you have made all necessary changes, create a new namespace in Kubernetes and deploy your agent to this namespace with the following code:
Since the image is quite large, it may take a minute or two for Kubernetes to download and run it. Once it is running, you should see your agent in your Azure DevOps server under “Project settings” –> “Agent pools” –> “Keda” (or your pool name) –> Agents. Since we want to use KEDA to scale our agents, deactivate this agent.
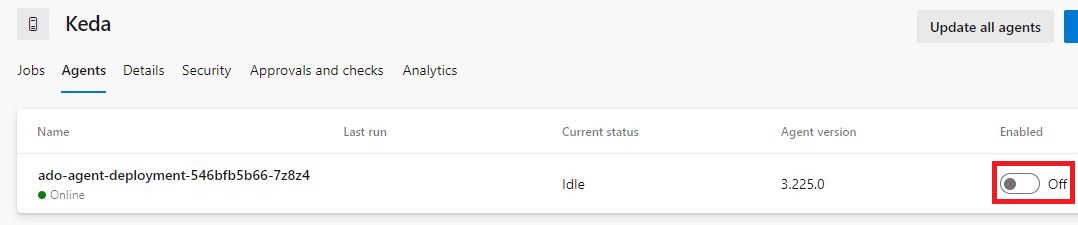
Deactivate the non KEDA Agent
Due to certain limitations of Azure DevOps, it is necessary to have at least one agent in the agent pool.
With the agent deactivated, it is time to configure the scaling of our agent with KEDA. First, you need to find the ID of your agent pool. You can do this by opening the following URL: https://dev.azure.com/<YOUR_ORGANIZATION>/_apis/distributedtask/pools?api-version=7.0. Replace <YOUR_ORGANIZATION> with the name of your Azure DevOps organization. This URL provides information about all your agent pools. Search for the name of your pool to find its ID.

Find the id of the Agent Pool
Once you have the ID, save the following code in a file named keda-scaled-jobs.yaml:
Replace the values of the image you want to use, the URL to your Azure DevOps server, the name of your agent pool, and the ID of your agent pool. I made comments in each line where you have to update a value. Be aware that the ID of the agent pool has to be a string and not a number.
After you have made all necessary changes, deploy the KEDA scaler with the following code:
The second line displays all status changes to your pods. This means you will see when new pods are started.
Running a Pipeline with your Agent in Kubernetes
To test the scaling of the agents, you’ve created a new pipeline that generates five jobs, each waiting for 5 minutes.
When you run the pipeline, you expect to see five pods of your agent created and all jobs being executed simultaneously.
After starting the pipeline and observing the console output where you’re watching the pods, you should see five pods running after a few seconds.
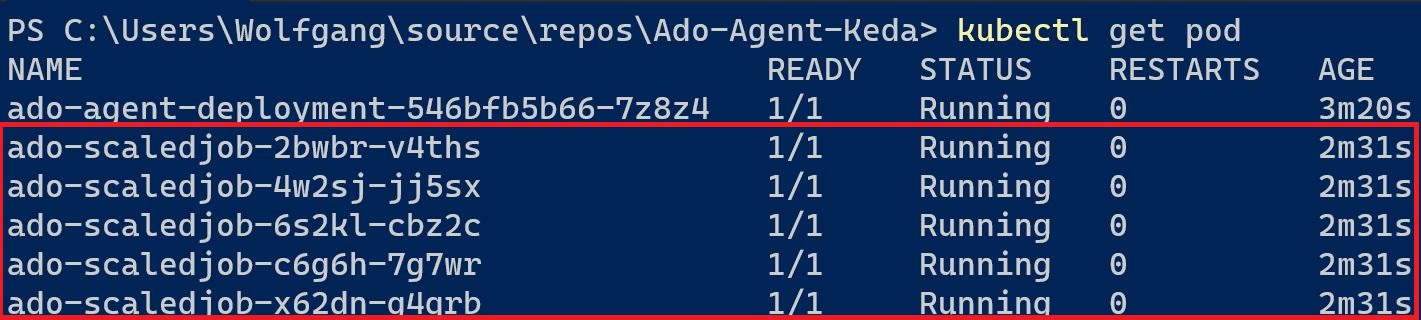
Five Agents are started in K8s
However, when you examine the jobs in your pipeline, you might notice that not all five are being executed.
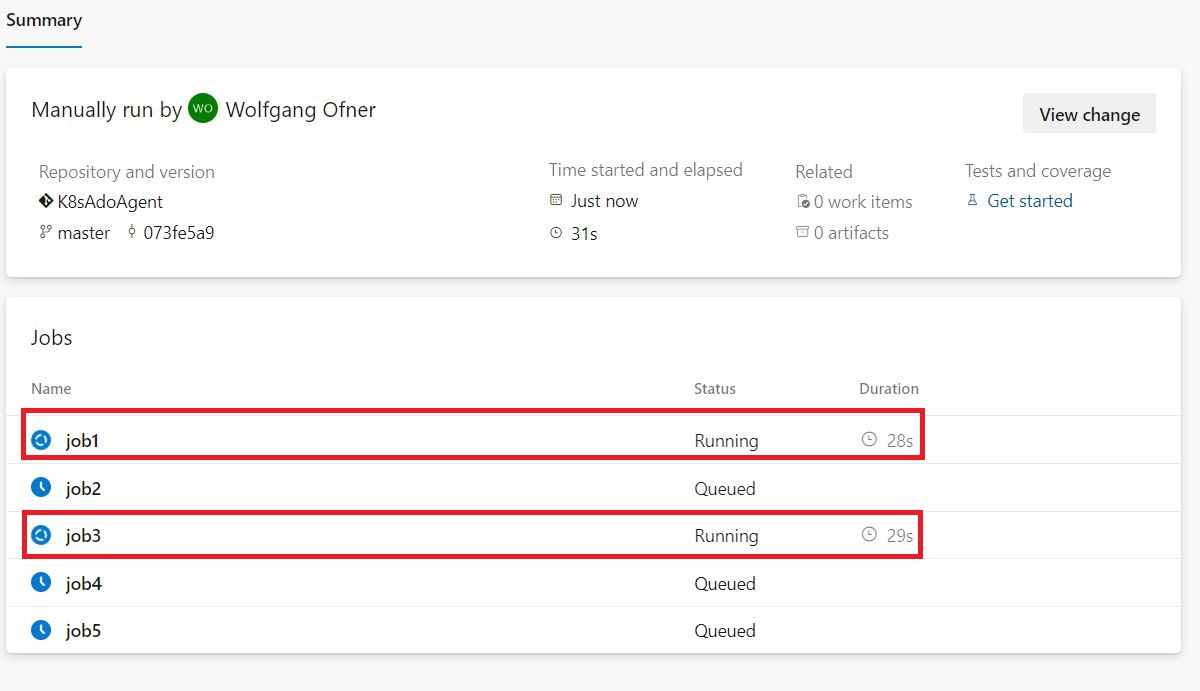
Two Pipeline Jobs are beeing executed
As shown in the screenshot above, only two jobs are executed. This is due to the licensing limitation of Azure DevOps. My Azure DevOps server only has two licenses for parallel execution. Therefore, even if I have five agents, only two jobs are executed at any given time. This is an important consideration when planning your pipeline execution strategy.
Limitations of Azure DevOps and KEDA
Indeed, while running your Azure DevOps agent inside a Kubernetes cluster and scaling it with KEDA offers many advantages, there are some limitations to be aware of:
- Azure DevOps requires at least one agent in an agent pool. If there are no agents, the pool will never be scheduled to execute pipelines.
- Licensing can limit the number of parallel jobs you can run.
- KEDA creates as many pods as needed to run all jobs in your pipeline, regardless of the available licenses in Azure DevOps.
- If you cancel the pipeline, pods scaled by KEDA are not cleaned up.
- All used agents remain in the agent pool and appear as offline.
- Building Docker images is not possible since dockershim was removed in Kubernetes 1.24. (However, you can use podman to build Docker images in Kubernetes, which I’ll show in my next post)
While these are not major limitations, they are important to consider. You could have a cleanup job that runs once a night to clean up finished pods and remove offline agents from your agent pool. Nevertheless, these factors should be taken into account when planning to run your agents inside a Kubernetes cluster.
When to run Azure DevOps Agents in Kubernetes
The question of “Why would I want to run my own agent in Kubernetes” is crucial, particularly given that Microsoft provides hosted agents that generally perform quite well. However, these hosted agents do come with certain limitations, such as being restricted to a 2-core CPU and 14 GB of RAM. Additionally, there are execution time limitations, with 1 hour for the free agent and 6 hours for paid agents, and there can also be challenges with integrating the agent into your network.
Running your agents in a Kubernetes cluster is definitely a niche use case, but it can be a valuable option in certain scenarios. For instance, if you have specific performance requirements or need greater control over your environment, running your own agents in a Kubernetes cluster can provide the flexibility and resources you need.
It is always good to have options and to choose the one that best fits your specific needs and circumstances.
Conclusion
In conclusion, running Azure DevOps agents inside a Kubernetes cluster, while a niche use case, offers a valuable alternative to using Microsoft’s hosted agents. This approach provides greater flexibility and control over your environment, allowing you to bypass certain limitations associated with hosted agents, such as CPU and RAM restrictions, execution time limitations, and network integration challenges.
However, it is important to be aware of the limitations that come with this approach, such as the need for at least one agent in an agent pool and potential licensing restrictions. Despite these challenges, having the option to run your own agents in a Kubernetes cluster can be a powerful tool in your DevOps arsenal, particularly for those with specific performance requirements or who need greater control over their environment.
As always, the best solution will depend on your specific needs and circumstances.
In my next post, I will show you how to build Docker images with your Azure DevOps agent that is running in a Kubernetes cluster using Podman.
Comments powered by Disqus.