

In my capacity as a Cloud Consultant in Switzerland, I had the opportunity to assist a client in developing a proof of concept for an intelligent ropeway system. The objective of this proof of concept was to assess potential technical strategies for managing an on-premises Kubernetes cluster, with a focus on ensuring secure and automated deployments.
This post is part of “Azure Arc Series - Manage an on-premises Kubernetes Cluster with Azure Arc”.
Project Overview: “Autonomous Ropeway System”
Before diving into the specifics of the project, it is essential to understand what a ropeway system entails. In Switzerland, ropeway systems are a common sight on virtually every mountain. They serve as a means of transportation for hikers in the summer and skiers in the winter. Recently, ropeway systems have gained popularity in urban settings as an innovative mode of transport that also offers sightseeing opportunities. Cities like Lisbon and Barcelona serve as prime examples of this trend. A typical ropeway vehicle, as shown in the image below, can accommodate between 4 and 12 passengers and often feature an external cage or structure for transporting bikes or skis up the mountain.
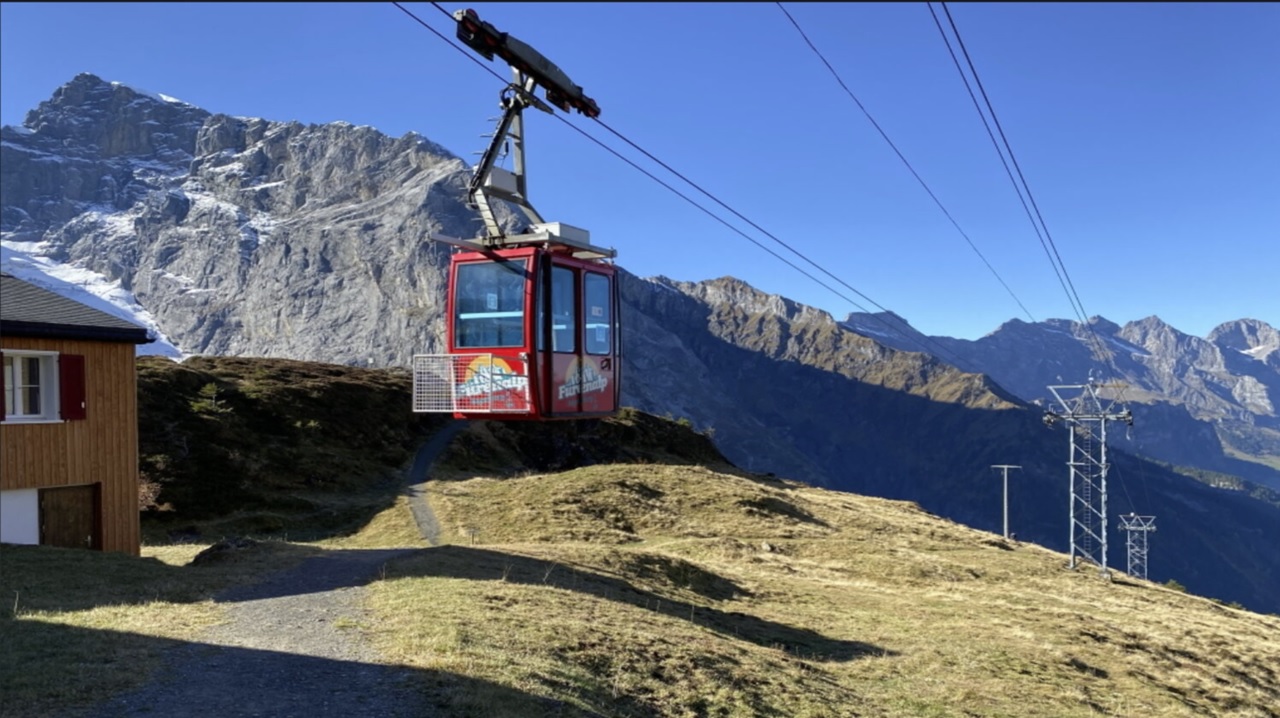
A ropeway vehicle in Switzerland
The “Autonomous Ropeway System” project aims to address several inefficiencies inherent in traditional ropeway systems:
- The labor-intensive process of manually placing vehicles on the rope in the morning and returning them to the garage in the evening lacks flexibility. For instance, if the weather deteriorates in the afternoon following a clear morning, many vehicles remain unused on the rope, leading to unnecessary wear and tear.
- Conventional ropeway systems typically operate between a single starting point and endpoint, with occasional stopovers. A smart system could enable vehicles to calculate a route through a network, allowing passengers to travel from one valley station to multiple mountain peaks, or in a city, to any desired destination without the need to switch lines.
The “Autonomous Ropeway System” project seeks to achieve the following objectives:
- Enable ropeway vehicles to autonomously exit the garage when required and return when no longer needed.
- Equip smart vehicles with the capability to navigate through a network.
- Reduce operational costs by minimizing wear and tear and energy consumption through the use of only necessary vehicles.
- Operate 24/7 with minimal human intervention, thereby further reducing operational costs and enhancing availability for passengers.
External Constraints and Preliminary Challenges
he project involves two primary stakeholders: the ropeway manufacturer and the company responsible for the ropeway system’s control units (my client). As such, we were presented with the following non-negotiable requirements:
- Utilization of existing on-premises hardware
- Prohibition of inbound traffic, which implies:
- No connection from Azure DevOps for deployment purposes
- Developers are unable to connect to the cluster for troubleshooting
- The question arises: How can logs be collected from the Kubernetes cluster?
- Neither VPN nor ExpressRoute connections are permitted
The accompanying diagram provides a network overview. The Kubernetes cluster can access the container registry via the firewall. However, the firewall blocks all incoming traffic, including that from Azure DevOps or developers.
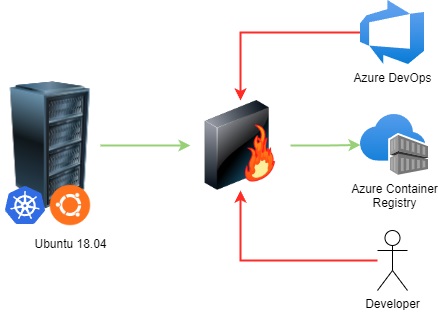
Network overview
Proof of Concept Evaluation
The ropeway system’s manufacturer constructed a full-scale station within one of its production halls to facilitate the testing of our application. This was a standout aspect of the project for me, as my work typically revolves around software-only projects and seldom involves hardware interaction. However, with this setup, I was able to initiate vehicle movement or door opening with a simple click in our software. The station is depicted in the two screenshots provided.
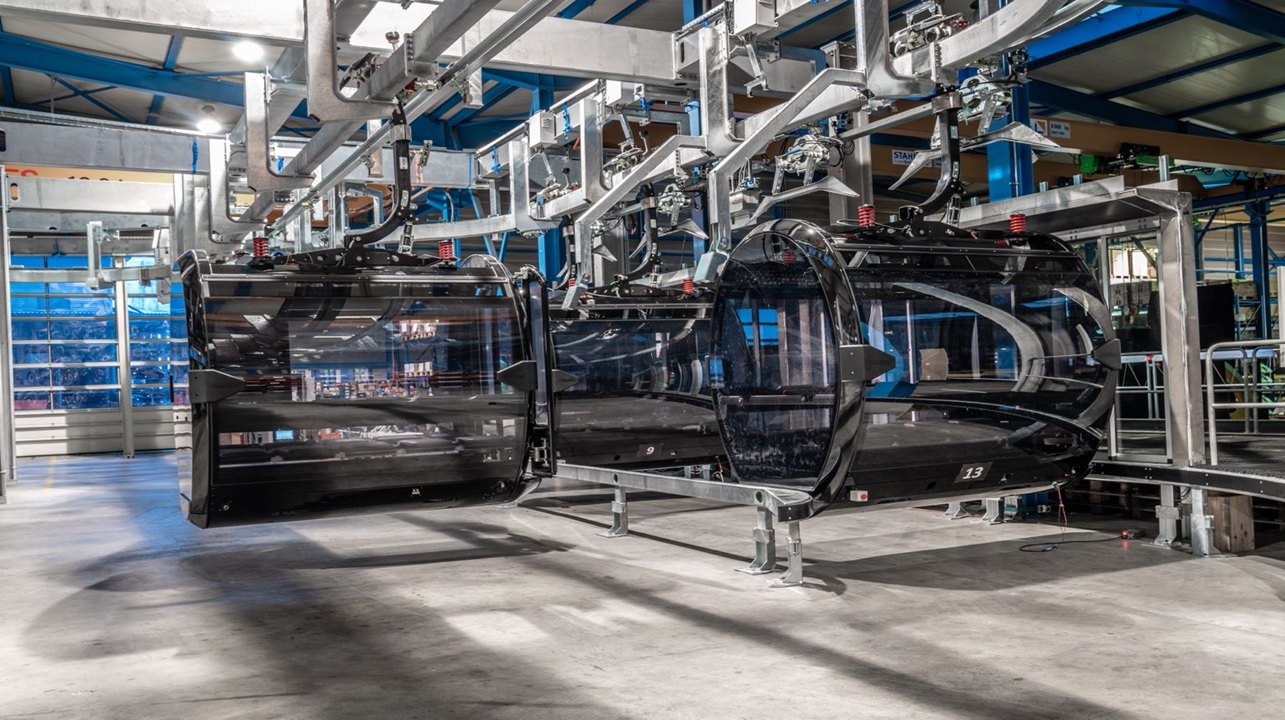
Testing the application with a real ropeway system
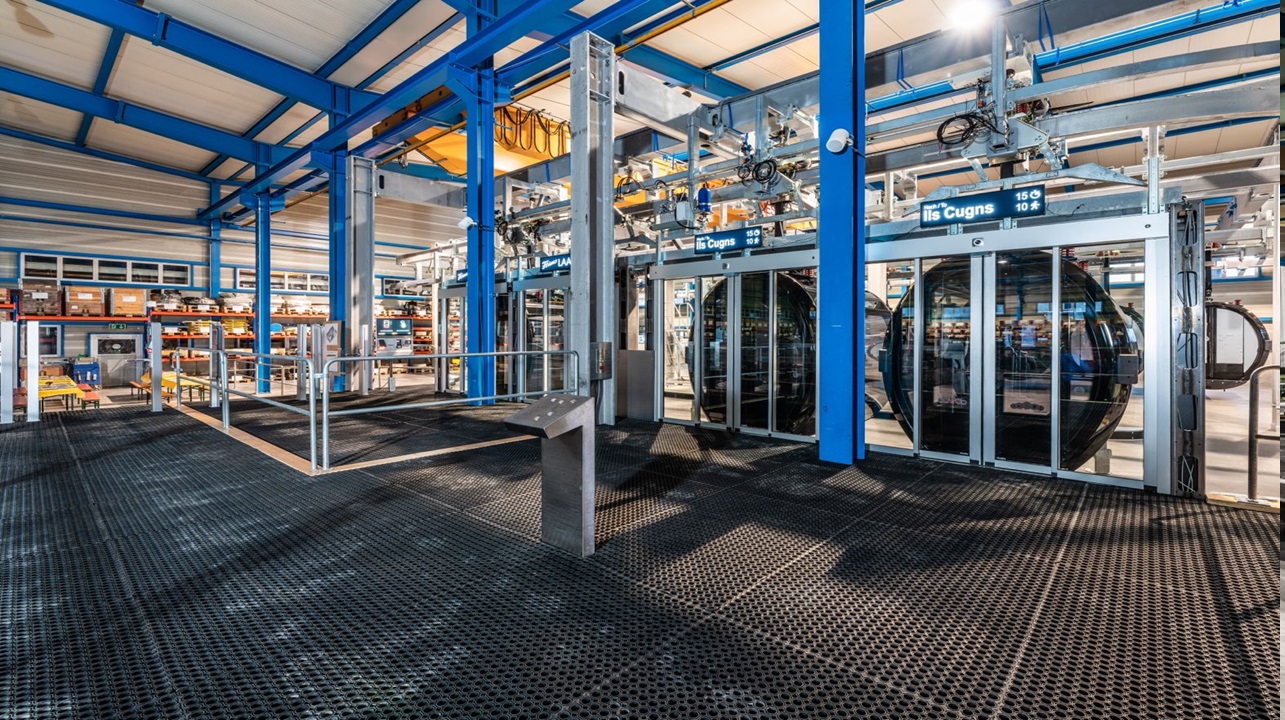
The entrance of the ropeway system
The second screenshot offers a glimpse into the user experience of the ropeway system. Initially, passengers must specify their destination using the destination dispatch system. This might be familiar to those who have used elevators in shopping malls or airports, where you may select your desired floor, and the system directs you to the appropriate elevator.
Once the destination is selected, pertinent information is displayed above the vehicle’s entrance. For instance, in the right red box, you can see that the destination is “Ils Cugns”, the journey will take 15 minutes, and the vehicle can accommodate 10 passengers.
Azure Arc Integration
Azure Arc facilitates the projection of infrastructure operating outside of Azure into the Azure environment. This includes not only on-premises infrastructure but also infrastructure hosted on other cloud platforms such as AWS or GCP. By projecting this infrastructure into Azure, you can leverage Azure’s management tools, thereby unifying the management of on-premises and cloud resources.
Azure Arc supports the management of the following types of infrastructure:
- Linux and Windows VMs, as well as bare metal servers
- Any Kubernetes distribution certified by the CNCF (Cloud Native Computing Foundation)
- Microsoft SQL Server
Upon installing the Azure Arc agent on your on-premises infrastructure, it becomes visible within the Azure Arc service in the Azure portal. The screenshot below illustrates two Kubernetes clusters managed via Azure Arc. On the left, you can see the various infrastructure options available, including Azure Stack HCI and VMware vCenters.
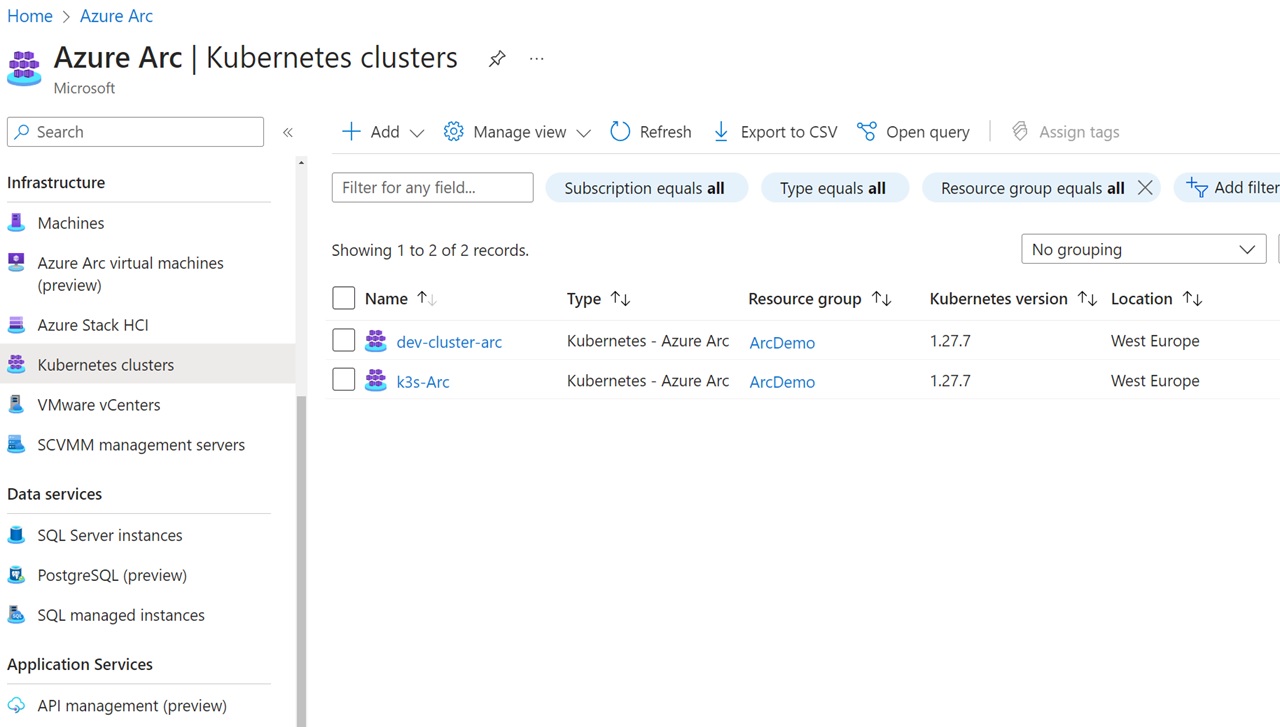
Azure Arc in the Azure portal
Azure Arc-enabled Kubernetes Cluster
Managing a Kubernetes cluster with Azure Arc is called “Azure Arc-enabled Kubernetes cluster”. Azure Arc allows you to manage your Kubernetes cluster with extensions. There are various extensions such as:
- Azure Monitor
- GitOps with Flux
- Azure Policy
- Azure Key Vault Secrets Provider
- Microsoft Defender for Containers
Additionally, the Azure Arc agent can open a connection from inside the cluster to Azure Arc. This conenction allows developers to access the cluster securely, even though the firewall blocks all incoming traffic.
Implementing the Proof of Concept with k3s and Azure Arc
The objective of the proof of concept was to establish a functional Kubernetes cluster equipped with a solution for automated deployments and monitoring. To this end, we opted to use k3s as our Kubernetes distribution. K3s is a lightweight Kubernetes distribution developed by Rancher, boasting a robust community and extensive documentation. Importantly, for rapid results, k3s can be installed with a single command:
This command installs a master node that also functions as a worker node. To add more worker nodes, copy the token from /var/lib/rancher/k3s/server/node-token and execute the following command on the new worker node:
Replace myServer with your master node IP-address and myToken with the previously copied token.
Installation of Azure CLI and Preparation of the Cluster for Azure Arc
The Azure Arc installation will be carried out on the master node of the k3s cluster. The first step in this process involves installing the Azure CLI and the connectedk8s extension. The following commands can be used to install the CLI, the extension, and subsequently log into Azure:
I recommend using the --use-device-code parameter for the az login command, as I have encountered issues when attempting to log in on a remote machine. Simply open the displayed URL and enter the code. You should be logged in within a few seconds.

Install the Azure CLI and login into Azure
After installing Azure CLI, it is necessary to register three resource providers. These are essential for the installation of Azure Arc. The registration process may take up to 10 minutes. The following commands can be used to register the resource provider and check if the registration is complete:
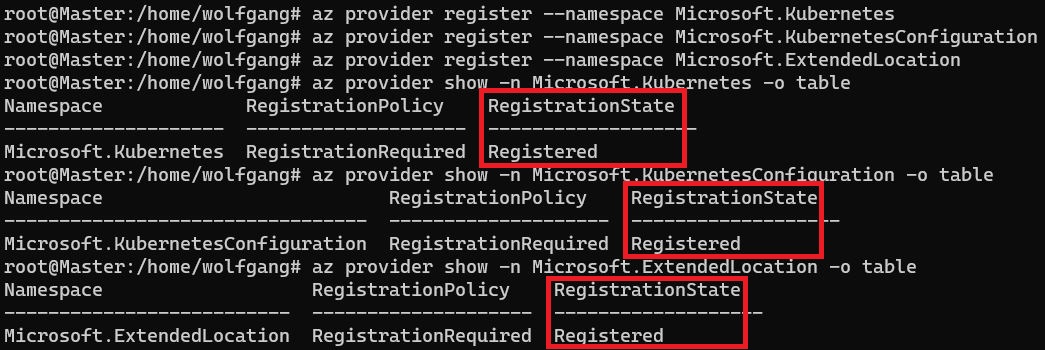
Register Service Provider in Azure
Ensure that the RegistrationState is Registered for all three resource providers. After the resource providers are registered, the final preparatory step involves moving the config file of the Kubernetes cluster. Azure Arc expects the config file to be located at /root/.kube/config, whereas k3s installs the config at /etc/rancher/k3s/k3s.yaml. The following command can be used to move the config file to the correct location:
If you encounter the error message “mv: cannot move /etc/rancher/k3s/k3s.yaml to /root/.kube/config: No such file or directory”, create the /.kube folder using the following command:
After moving the config file, Azure Arc can be installed using the following command:
Ensure that you select a location close to your on-premises infrastructure. Currently, not all Azure locations support Azure Arc. The Azure CLI will notify you if you have selected an unsupported region and provide information on the currently available regions. The name parameter configures the name of the Azure Arc instance.

Install Azure Arc
The installation should only take a couple of minutes. All Azure Arc related applications will be installed in the azure-arc namespace. You can check the pods using kubectl:
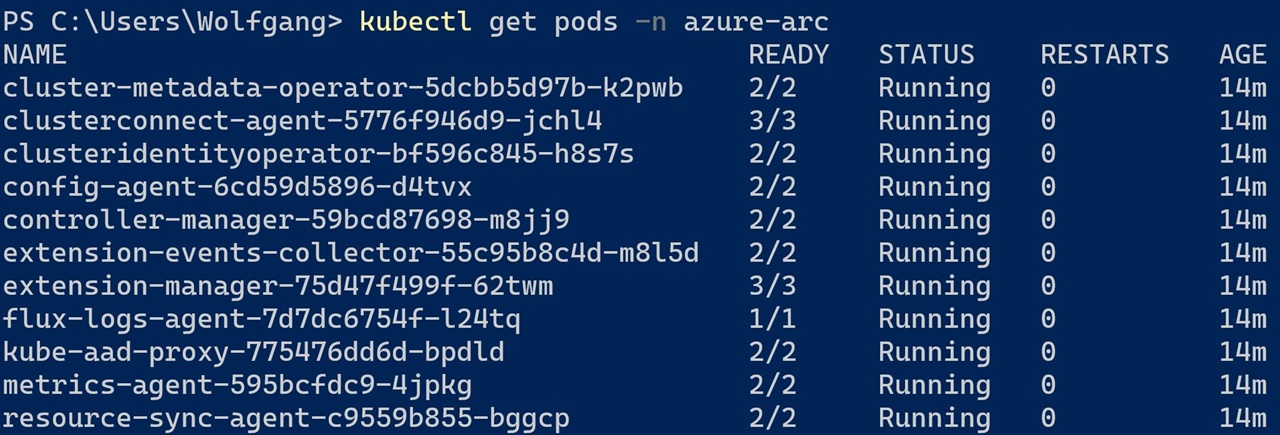
The Azure Arc pods in the azure-arc namespace
Upon returning to the Azure Portal, click on any of the Kubernetes resources panes on the left, and you will see that you need to sign in to view the Kubernetes resources.
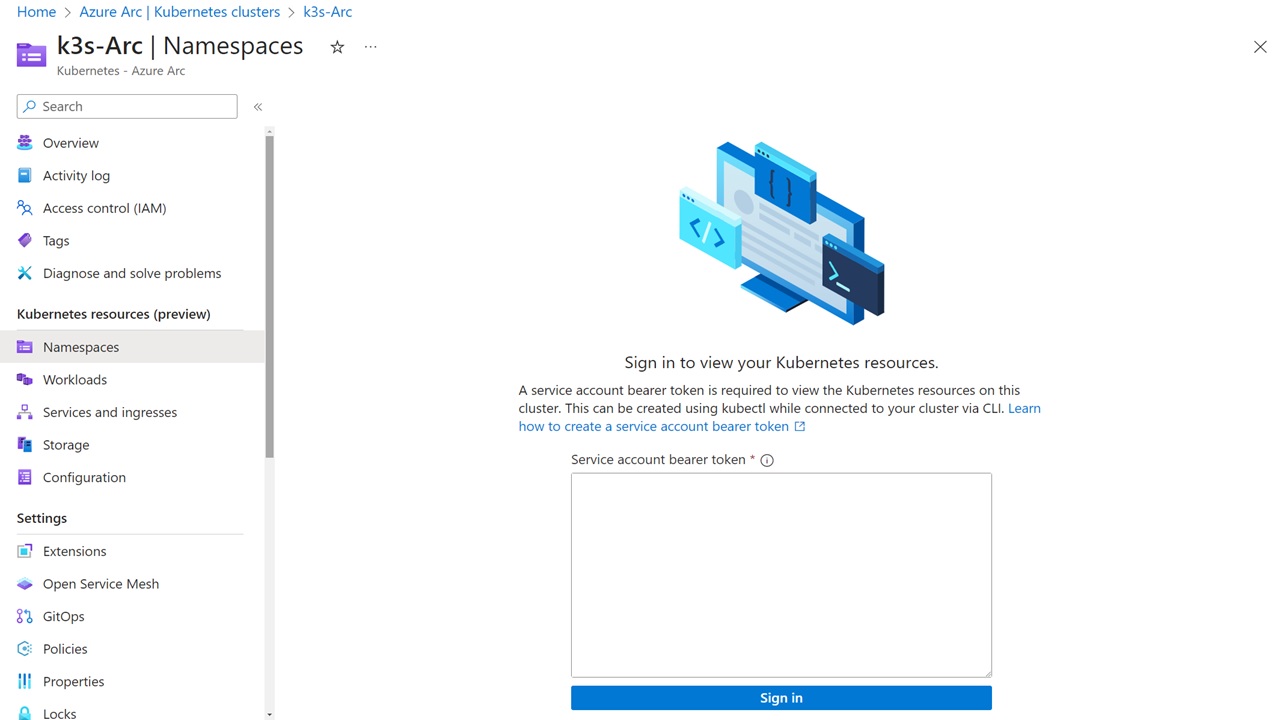
Sign in to view your Kubernetes resources
Generating an Access Token for the k3s Cluster
There are two primary methods for creating a token for cluster access: Azure RBAC using Microsoft Entra ID, or Kubernetes RBAC. While Azure RBAC is generally the preferred method for handling authentication in the long term, Kubernetes RBAC was more suitable for the proof of concept due to its simpler setup.
With the introduction of Kubernetes 1.22, we now have access to the TokenRequest API, which offers a more secure approach to token creation compared to the previously used Secret object. Let’s explore how we can utilize this API to enhance security in token creation.
To use the API, you first need to create a new service account and bind a role to it. Then, you can use the kubectl create token <Service Account Name> command to create the token.
The create token command will automatically generate the token and display it on the console for you.
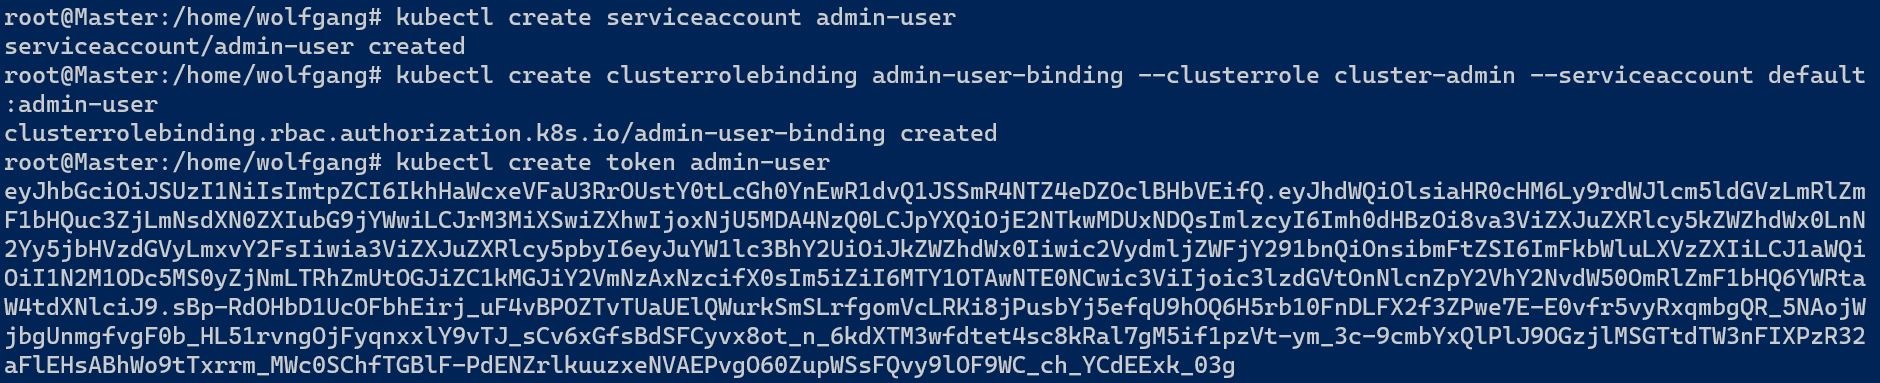
Use the TokenRequest API
Once you have the token, you can paste it into the Azure portal, and you will be able to see all the resources running in the on-premises k3s cluster.
Accessing the k3s Cluster from a Developer Computer with Azure Arc
While using the Azure Portal to access the Kubernetes cluster is convenient, as a developer, you might be more accustomed to using kubectl or custom dashboards. To access the Kubernetes cluster from your development environment, you can use the following Azure CLI command.
Replace <TOKEN> with the token you created earlier. You can use this command on any computer as long as the Azure CLI is installed. The command downloads the Kubernetes config file, sets the context, and creates a proxy connection through Azure Arc to the Kubernetes cluster.

Create a connection to the Kubernetes Cluster
After the connection is established, you can open a new terminal window and use kubectl as you normally would. It’s also possible to use any dashboard to display the resources from the Kubernetes cluster. This provides a familiar and efficient way to manage your Kubernetes resources.
Implementing Azure Features on an On-Premises Kubernetes Cluster Using Azure Arc Extensions
Azure Arc employs extensions to integrate Azure features into an on-premises Kubernetes cluster. The proof of concept utilized the following three extensions:
- GitOps Flux
- Azure Monitor Container Insights
- Azure Key Vault Secrets Provider
Automated Deployments with the GitOps Flux Azure Arc Extension
The GitOps Flux agent, based on the open-source tool Flux, operates within the Kubernetes cluster and periodically checks a Git repository for changes. If there are new commits in the repository, the Flux agent downloads these changes and applies them to the cluster. This approach facilitates automated deployments using Azure DevOps or GitHub and CI/CD pipelines, even without Azure DevOps having access to the Kubernetes cluster.
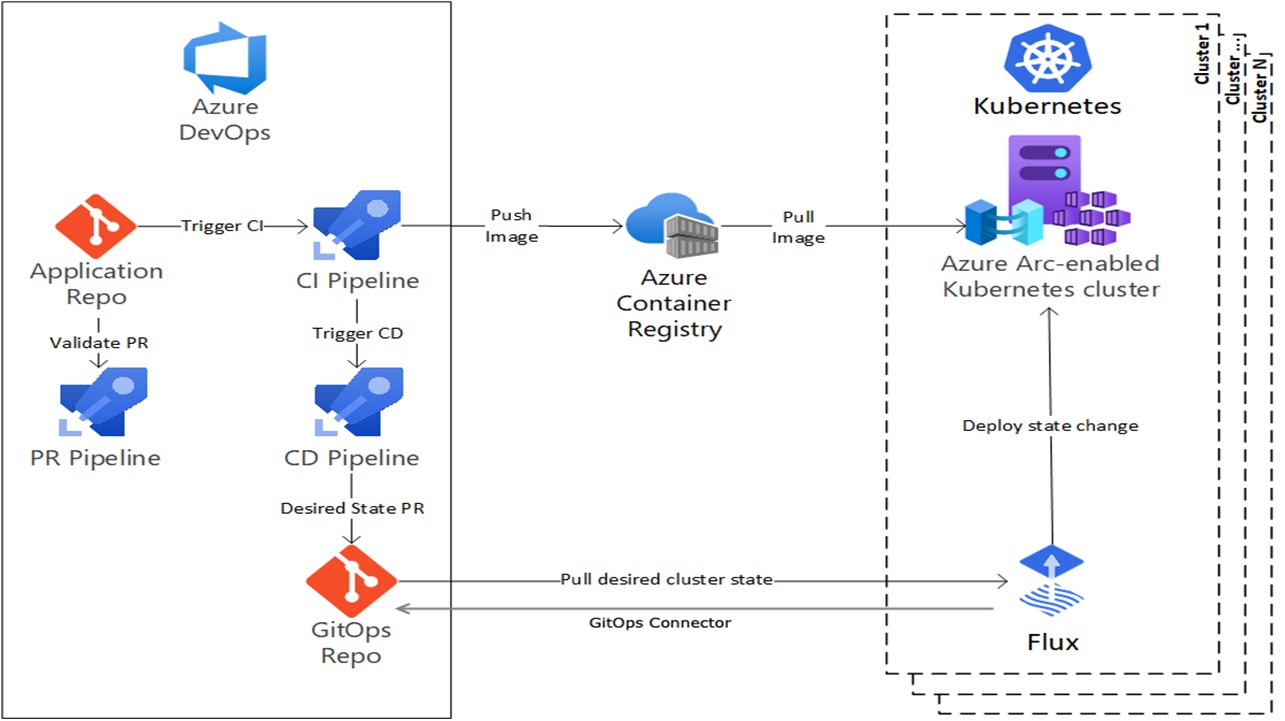
The Flux GitOps workflow
The workflow from implementing a new feature until it runs in the cluster is as follows:
- A developer commits new changes using a pull request to the main branch. This pull request triggers a pipeline which typically checks the code quality and runs basic unit tests.
- Once the pull request is approved and merged to the main branch, the CI pipeline is automatically triggered. This pipeline runs more tests, creates a Docker image, and pushes it to a container registry such as DockerHub or Azure Container Registry.
- After the CI pipeline finishes successfully, the CD pipeline is triggered. This pipeline prepares everything needed for the deployment.
- We used a Helm chart for the deployment. The CD pipeline only had to update the version of the Docker image in the Helm chart. The pipeline used an Azure CLI script to read the newest tag from the Azure Container Registry and then used search and replace in the values.yaml file of the Helm chart to set the new tag version. Lastly, the CD pipeline committed the change to the GitOps repository.
- After the CD pipeline committed the changes, the Flux agent inside the Kubernetes cluster will see that there was a new commit in the GitOps repo and downloads it. After the Helm chart is downloaded, the Flux agent applies it and the Kubernetes cluster will download the new image from the Azure Container Registry.
Most enterprise applications are hosted in private Git repositories, which means that the GitOps Flux agent can’t access it by default. Therefore, you have to create a Personal Access Token (PAT) first. The steps are basically the same in GitHub and Azure DevOps. In Azure DevOps, click on settings and select Personal Access Token. Then select “+ New Token” and a flyout will appear. There, set a name and configure the expiration and access scope. Usually, it is enough to set the Read permission in the Code scope.
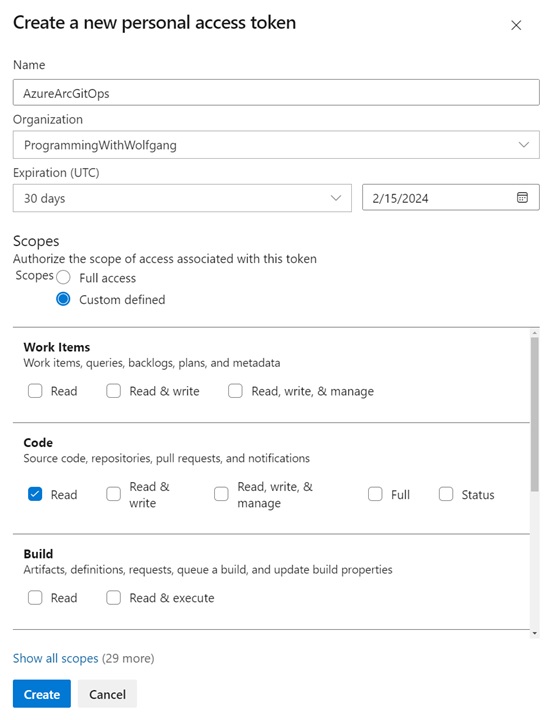
Configure the new Personal Access Token
After creating the Personal Access Token (PAT), it’s crucial to copy it immediately as this is the only time it will be visible. If you lose it, you’ll need to generate a new one.
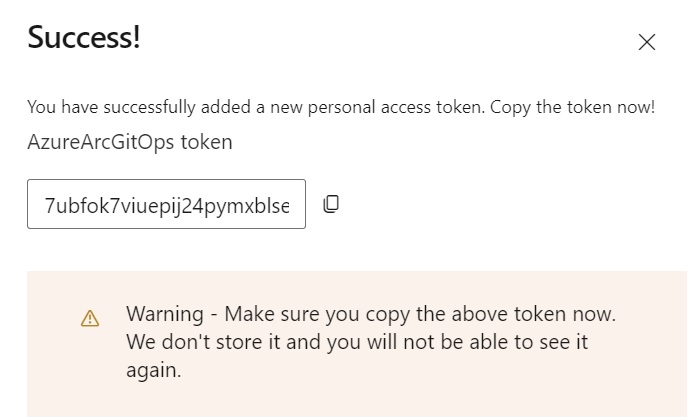
Copy the newly created PAT
With the token in hand, you can create the GitOps Agent using Azure CLI. The installation process is straightforward and requires just a single command.
With the token in hand, you can create the GitOps Agent using Azure CLI. The installation process is straightforward and requires just a single command. The first time you execute the command, Azure will also install the GitOps extension. The parameters should be self-explanatory. It’s important to replace the https-user and https-key with the user that created the PAT and with your PAT, and also the url with the URL of your GitHub or Azure DevOps URL. The kustomization parameter configures the kustomize file.
The installation should only take a few minutes. After it’s finished, you’ll see the new GitOps agent in the Azure portal in the GitOps pane of your Azure Arc instance.
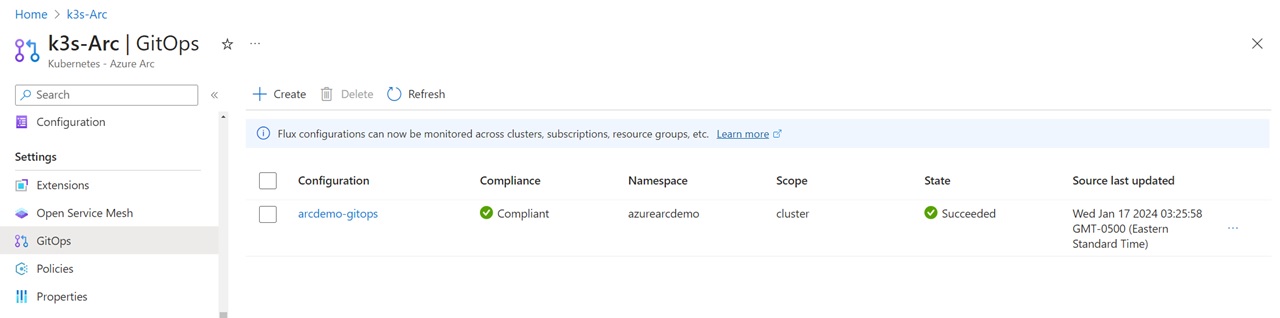
The GitOps agent was installed successfully
You can click on the agent and get an overview of the configuration. In case of an error, you will also see them here which should help you to analyze what’s going on. The most common errors are that the PAT is invalid or that a path or URL in the GitOps config was wrong.
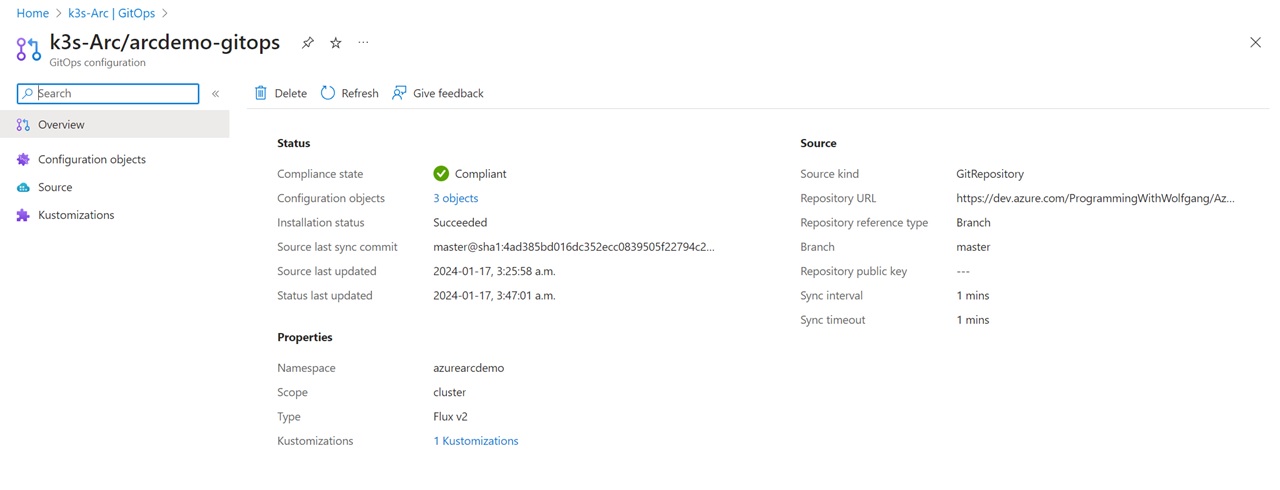
The GitOps agent config in the Azure portal
Once everything looks good, wait a couple of minutes and then you should see your application running in the Kubernetes cluster.

The application was successfully deployed
The GitOps Flux extension uses Kustomize for the Kubernetes configuration management. Kustomize is an open-source tool and allows you to declaratively configure your Kubernetes cluster. The proof of concept was kept as simple as possible and therefore only used the most basic functionality of Kustomize.
The GitOps agent references a kustomize file. This file can be used to configure the cluster but in our case, it only references a YAML file called HelmRelease.yaml.
The HelmRelease.yaml file contains a reference to the Helm chart and everything that is needed to configure it.
As mentioned before, we kept the proof of concept as simple as possible, therefore all the additional configuration possibilities of Kustomize are out of scope for this article.
Gaining Insight into the Cluster with the Azure Monitor Extension
Azure Monitor is an excellent tool for gaining insights into your cluster’s activities and for sending out notifications if something isn’t functioning as expected. To install the Azure Monitor agent inside your Kubernetes cluster, you can use the following command:
This command first creates an Azure Log Analytics Workspace and then installs the Azure Monitor extension. If you don’t create the Log Analytics Workspace first, Azure will automatically create one for you.
Once the agent is started, it will begin to collect metrics and logs from your containers and also from the nodes, and sends everything to the Work Analytics Workspace. Now, you can use Azure Monitor to create dashboards, set up alarms, or query the provided data. Azure Monitor already comes with pre-configured dashboards in the Azure portal.
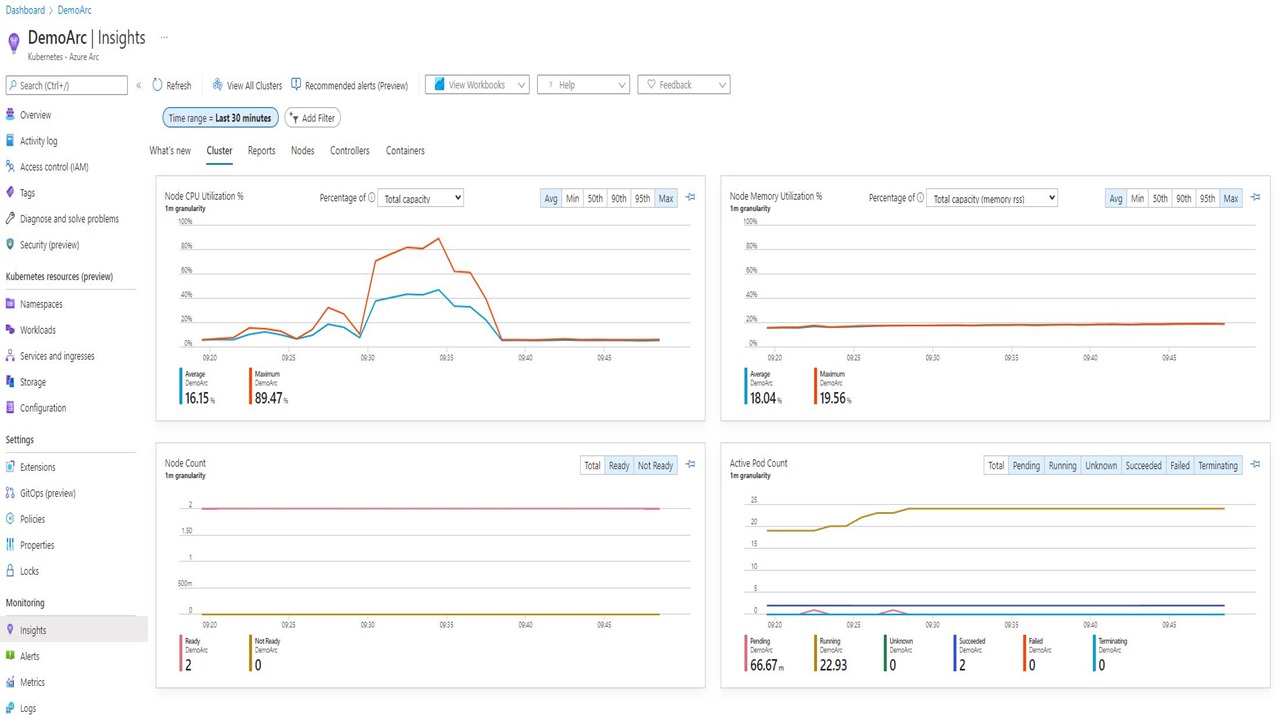
Azure Monitor pre configured dashboards with cluster information
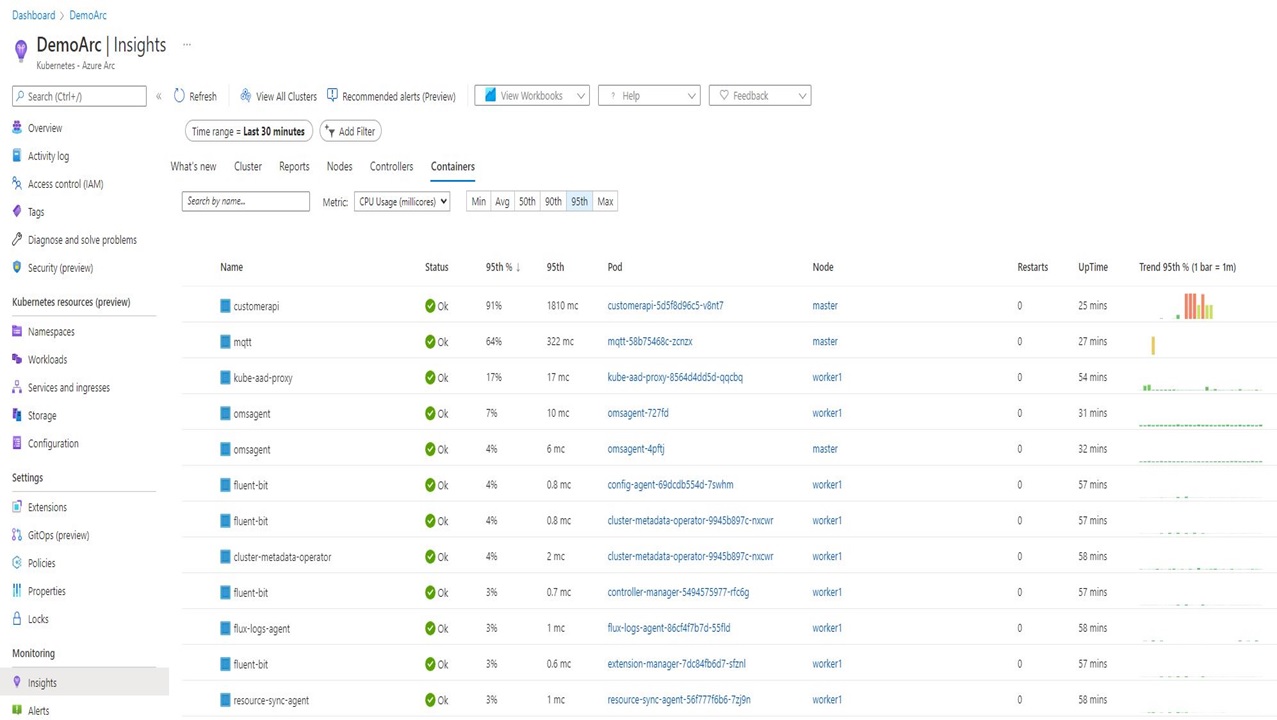
Azure Monitor can be used to analyze containers
Securely synchronize Secrets with the Azure Key Vault Extension
Azure Key Vault is the go-to solution for storing secrets and certificates in Azure. With the Azure Key Vault secrets provider extension for Arc-enabled Kubernetes clusters, it is possible to configure an Azure Key Vault as the secret provider of the cluster. This means that the cluster automatically synchronizes secrets from Azure Key Vault and can optionally attach them as environment variables to the pods. The significant advantage of using this extension is that developers don’t have to change anything in their application.

Azure Key Vault can be used as secrets store provider
To use Azure Key Vault as your secrets provider, you have to create a service principal and give this principal permissions to access secrets or certificates. Then you add this service principal to the cluster and configure which secrets you want to configure. The exact implementation would be too much for this article, but I will write a follow-up article soon.
For more details on the implementation, see Microsoft’s documentation.
Additional Azure Arc Features
This concludes the proof of concept, but Azure Arc offers many additional features. With an Azure Arc-enabled Kubernetes cluster, it’s possible to run Azure services such as Azure App Service, Azure API Management, or Azure Event Grid outside of Azure. Additionally, you can run data services such as Azure Machine Learning or Azure SQL Managed Instance in your on-premises cluster. This allows you to use these Microsoft-managed services while keeping all the data inside your own data center on-premises. The only data sent to Azure is metadata, which is needed for billing.
While we could discuss all the Azure Arc features for days, I believe this article is already comprehensive enough. You can see an overview of all the Azure services available with Azure Arc in the provided screenshot.
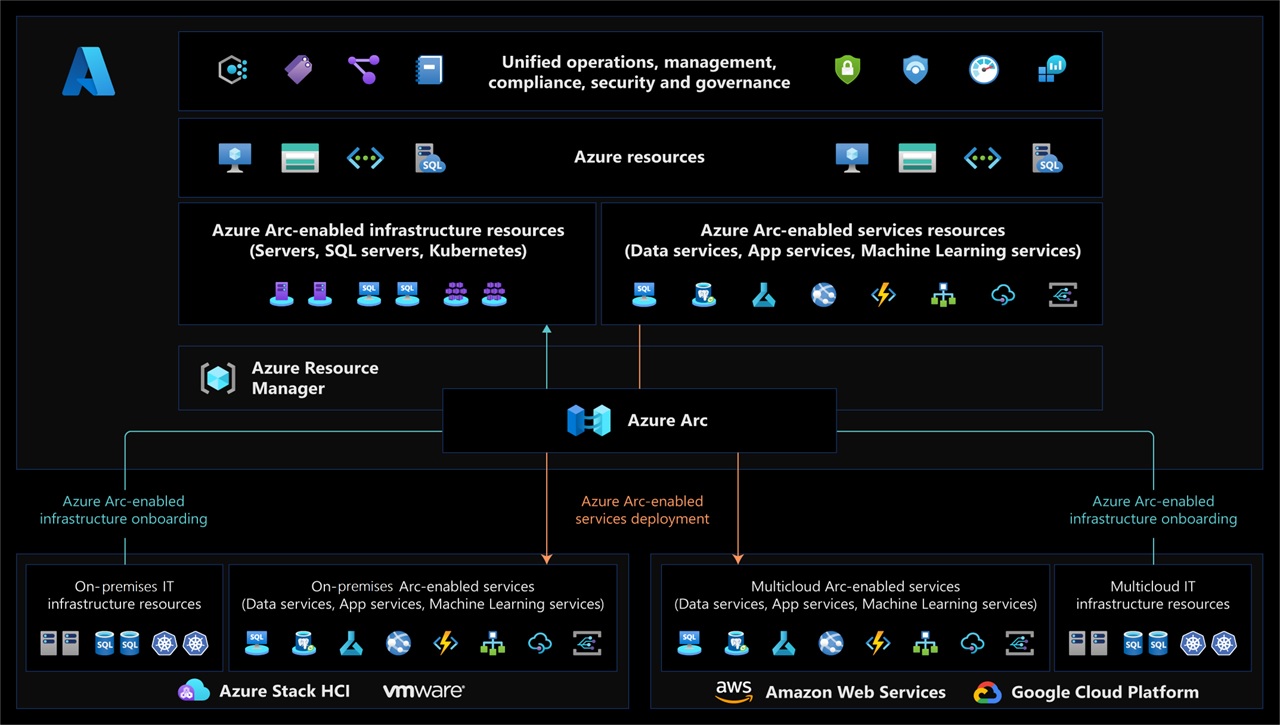
An overview of the Azure Arc capabilities
Costs of Azure Arc
In general, Azure Arc is quite affordable for the functionality it provides. Each Azure Arc service has different pricing. For example, an Azure Arc-enabled Kubernetes cluster costs $2 per vCPU per month, with the first 6 CPUs free. The Azure Arc-enabled SQL Server Standard Edition costs $73 per month if you don’t have a license.
For all the details about pricing, check out the Azure Arc Pricing page.
Outcome of the Proof of Concept
While Azure Arc has its quirks and can sometimes be a bit complicated and poorly documented, the proof of concept was entirely successful. We were able to overcome the challenges of an on-premises Kubernetes cluster behind a firewall and implemented automated deployments, monitoring, and handling secrets. This allows for an automated process that can easily be audited and additionally helps to operate the cluster as efficiently as possible.
I was only part of the proof of concept phase, therefore, I don’t know if the company decided to implement it this way or choose a different route. In my opinion, I don’t see any reason why you shouldn’t use Azure Arc to manage your on-premises infrastructure and also run Azure services in your own data center if needed.
Resources, Slides and Video of this Talk
- I gave a talk about this topic at the Boston Azure User Group. You can find the video of this talk here: Video - Bring DevOps to the Swiss Alps - Boston Azure User Group.
- You can find the presentation of the talk on GitHub.
- Demo Code Application Repository
- Demo Code GitOps Repository
- I working on creating videos for everything Azure Arc related Youtube Playlist
- I am also writing articles about Azure Arc: Azure Arc Series - Manage an on-premises Kubernetes Cluster with Azure Arc
- This article is part of the Azure Spring Clean 2024 and the Q&A session is scheduled for Friday, March 8, 2024 5am ET / 10am UTC
Comments powered by Disqus.