

Microservices need to be deployed often and fast. To achieve this, they often run inside a Docker container. In this post, I will show how easy it is to add Docker support to a project using Visual Studio.
What is Docker?
Docker is the most popular container technology. It is written in Go and open-source. A container can contain a Windows or Linux application and will run the same, no matter where you start it. This means it runs the same way during development, on the testing environment, and on the production environment. This eliminates the famous “It works on my machine”.
Another big advantage is that Docker containers share the host system kernel. This makes them way smaller than a virtual machine and enables them to start within seconds or even less. For more information about Docker, check out Docker.com. There you can also download Docker Desktop which you will need to run Docker container on your machine.
For more information, see my post “Dockerize an ASP .NET Core Microservice and RabbitMQ”
Add Docker Support to the Microservice
You can find the code of the demo on GitHub.
Open the solution with Visual Studio 2019 and right-click on the CustomerApi project. Then click on Add and select Docker Support…
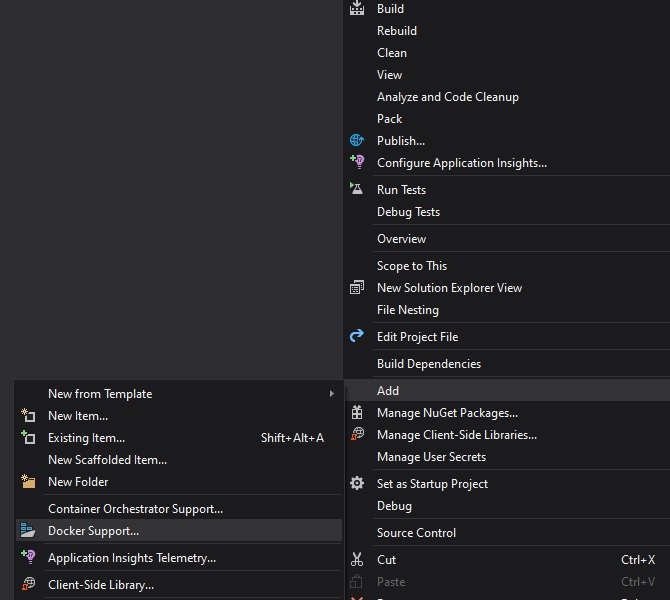
Add Docker Support to the API project
This opens a window where you can select the operating system for your project. If you don’t have a requirement to use Windows, I would always use Linux since it is smaller and therefore faster.

Select the operating system for the Docker container
After you clicked OK, a Dockerfile was added to the project and in Visual Studio you can see that you can start the project with Docker now.

Start the project in Docker
Click F5 to start the application and your browser will open. To prove that this application runs inside a Docker container, check what containers are running. You can do this with the following command:
On the following screenshot, you can see that I have one container running with the name CustomerApi and it runs on port 32770. This is the same port as the browser opened.

The microservice is running inside a Docker container
The Dockerfile explained
Visual Studio generates a so-called multi-stage Dockerfile. This means that several images are used to keep the output image as small as possible. The first line in the Dockerfile uses the ASP .NET Core 3.1 runtime and names it base. Additionally, the ports 80 and 443 are exposed so we can access the container with HTTP and HTTPs later.
The next section uses the .NET Core 3.1 SDK to build the project. This image is only used for the build and won’t be present in the output container. As a result, the container will be smaller and therefore will start faster. Additionally the projects are copied into the container.
Next, I restore the NuGet packages of the CustomerApi and then build the CustomerApi project.
The last part of the Dockerfile publishes the CustomerApi project. The last line sets the entrypoint as a dotnet application and that the CustomerApi.dll should be run.
Conclusion
In today’s DevOps culture it is necessary to change applications fast and often. Additionally, microservices should run inside a container whereas Docker is the defacto standard container. This post showed how easy it is to add Docker to a microservice in Visual Studio.
You can find the code of this demo on GitHub.
Comments powered by Disqus.